Edit |
  
|
Edit |
|
To Edit a SKU:
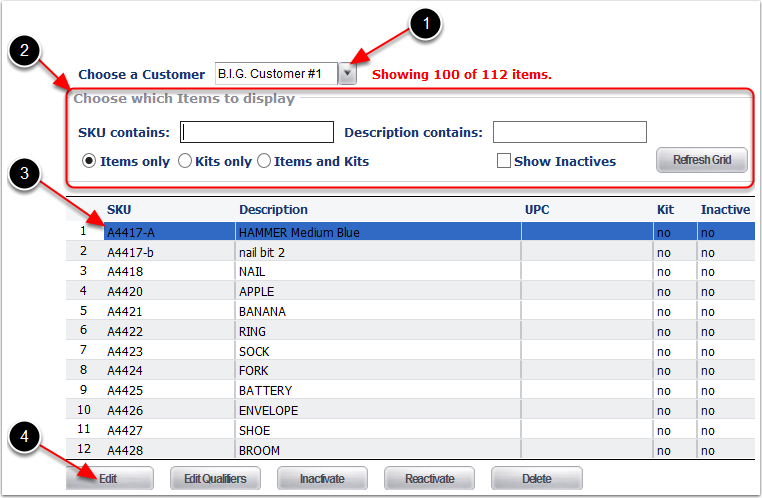
1.Choose a Customer by typing the customer name or selecting from the dropdown menu.
2.Search for the SKU see Manage Items - Items and Kit Search Options Overview (Manual Edit) of this user guide.
3.Highlight the SKU Line Item of the SKU to Edit.
4.Click Edit the system will go to the Update Item screen.
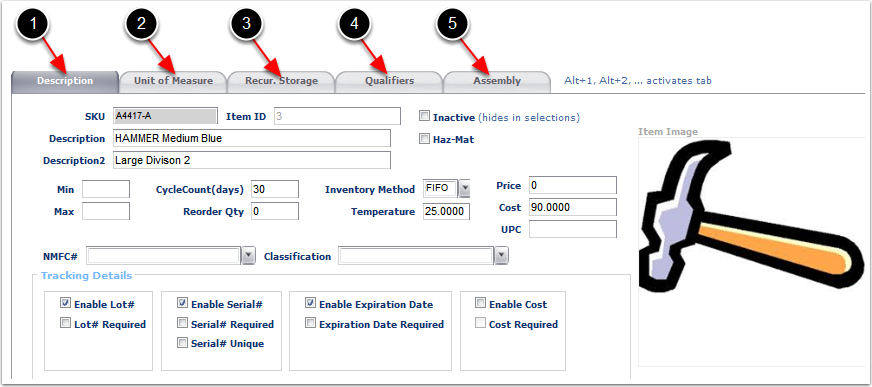
From the Update Item Screen, navigate through the following tabs to Add or Remove values to the Items or Kit Items:
1.Description Tab - Contains general information regarding the Item.
2.Unit of Measure Tab - Contains detailed specifications regarding types of unit of measures.
3.Recur. Storage Tab - Used to setup recurring storage billing.
4.Qualifiers Tab - Used to create SKU level separators.
5.Assembly Tab - Used to create Kitting components for Assemblies.
Through the Update Item Screen the system will NOT allow to:
•Delete or Modify Qualifiers - Qualifiers can only be Added, to Delete or Modify refer to Manage Items - Edit Qualifers section of this user guide.
•Rename the SKU - To rename a SKU refer to Items - Batch Item Update section of this user guide.
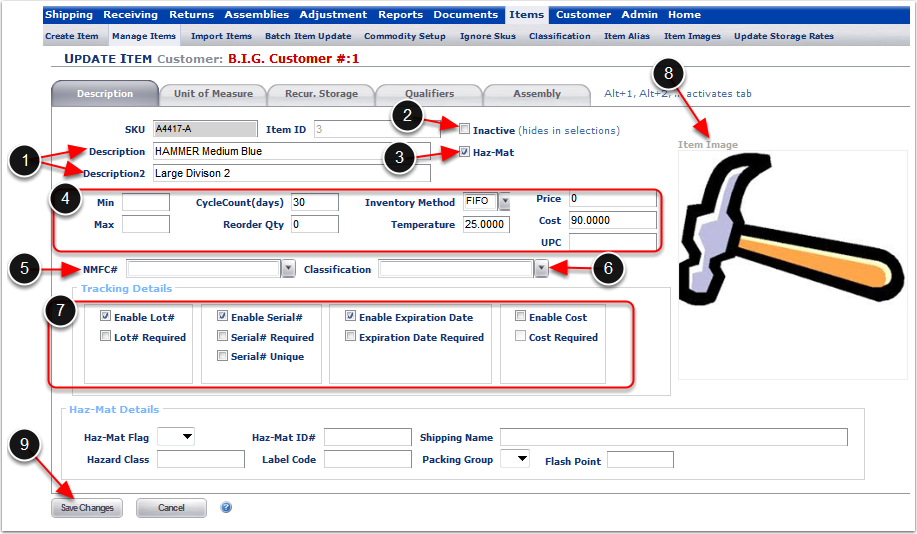
Navigate through the Description Tab to Update:
1.Item descriptions if applicable (these are free form text boxes).
2.Inactivate - Hide Item or Kit Item from selections.
3.Haz-Mat - Activate or Inactivate the SKU Haz-mat parameters. Refer to the Edit Items - Haz-Mat Details of this user guide to modify the Haz-Mat Material Parameters.
4.Inventory Parameters for the Item or Kit Item:
a.Min - (Optional) Enter a number to trigger the sending of a notification e-mail when inventory levels of this SKU drop below the entered value. To set up the Email Notifciation see the Customer Notifies section of the Customer user guide.
b.Max - (Optional) Enter a number to trigger the sending of a notification e-mail when inventory levels of this SKU rise above the entered value. To setup the Email Notification see the Customer Notifies section of the Customer user guide.
c.Cycle Count - (Optional) Enter a number to designate how many days can go by before a cycle count should be performed for this SKU.
d.Reorder Qty - (Optional) Enter a number to send out a notification e-mail alerting to re-order this SKU when the inventory reaches the given value. To set up the Email Notification see the Customer Notifies section of the Customer user guide.
e.Inventory Method - (Required) Allocate inventory On Hand for this SKU to an order (FIFO, LIFO, FEFO). If a method is not specified, it will default to FIFO.
f.Temperature - (Optional) Enter the temperature this SKU must be stored at if it is temperature sensitive.
g.Cost - (Optional) Enter either the value of the item, or the landed cost associated with it.
h.UPC - (Optional) Enter the UPC number of the Item.
5.NMFC# - (Optional) Select the NMFC # from the drop down menu. To create the NMFC numbers refer to the Item - Commodity Setup section of this user guide.
6.Classification - (Optional) Select the Classification from the drop dowm menu. To Create Classifications refer to the Item - Classification section of this user guide.
7.Enable or Disable any Tracking Details of the SKU by checking the box:
a.Enable Lot # - Assigns Lot numbers to the SKU at time of receiving.
b.Lot # Required - Makes Lot numbers a requirement for the SKU.
c.Enable Serial # - Assigns Serial numbers to the SKU at time of receiving.
d.Serial # Required - Makes Serial numbers a requirement for the SKU.
e.Serial # Unique - Requires for each Serial number to be unique when receiving.
f.Enable Expiration Date - Assigns Expiration Dates to the SKU at time of receiving.
g.Expiration Date Required - Makes Expiration dates a requirement for the SKU.
h.Enable Cost - Assigns Cost to the SKU at time of Receiving.
i.Cost Required - Makes the Track by Cost a requirement.
8.Item Images - To Add, Remove, or Change Image refer to the Items - Item Images user guide.
9.Click Save after completing information and to go back to the Manage Items screen.
The Haz-Mat Details are optional to complete:
1.Haz-Mat Flag - Select one of the two choices from the dropdown menu: X means an Irritant or Harmful product, RQ (Reportable Quantity) means that a reportable quantity of a Hazardous Substance in being shipped in a bulk packaging or a single non-bulk packaging.
2.Hazard Class - Enter the Class of the Hazardous Item (Example shows 3 meaning Flammable Liquids).
3.Haz-Mat ID# - Enter the level of danger. Levels are from 0 to 4, zero being the least dangerous and four being the highest level of danger.
4.Label Code - Enter the Haz-mat Label Code (Example shows DOT).
5.Shipping Name - Enter a description of the Haz-Mat Item (Can be any name related to the shipment).
6. Packing Group - Select one of the three choices from the dropdown menu: Packing Group I is for high danger, Packing Group II is for medium danger, Packing Group III is for Low danger.
7. Flash Point - Enter the combustible temperature of the product.

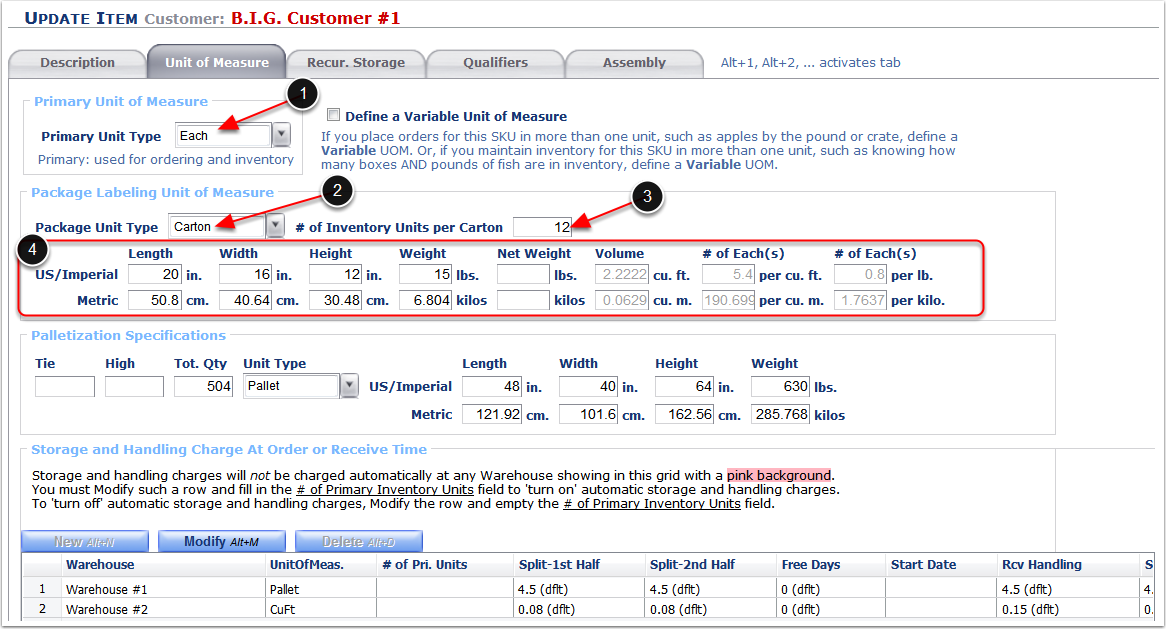
Navigate through the Unit of Measure Tab to Update:
1.Primary Unit Type - (Required) Select the Primary Unit Type for the SKU from the dropdown list. Keep in mind that the Primary Unit Type is the main Unit Type you will use when ordering and maintaining inventory quantities of the SKU.
2.Package Unit Type - (Required) Select the Package Unit Type for the SKU from the drop down list.
3.# of Inventory Units per - (Required) Enter the number of primary units per packaging unit of measure in the # of Inventory Units per field. (For Example: If a product comes packed with 12 pieces per carton, and assuming that it is a requirement to keep track of Piece count and Carton count, you will select "Each" as the Primary Unit Type, "Carton" as the Package Unit Type and enter "12" as the # of Inventory Units per. This way we are telling the system that 12 eaches equal a full carton.
4.Lenth/Width/Height/Weight - (Required) Enter the Dimensions and Weight of the Packaging Unit Type (Required), the Net Weight is an Optional Field. The volumes and unit breakdown will automatically generate based on these values.
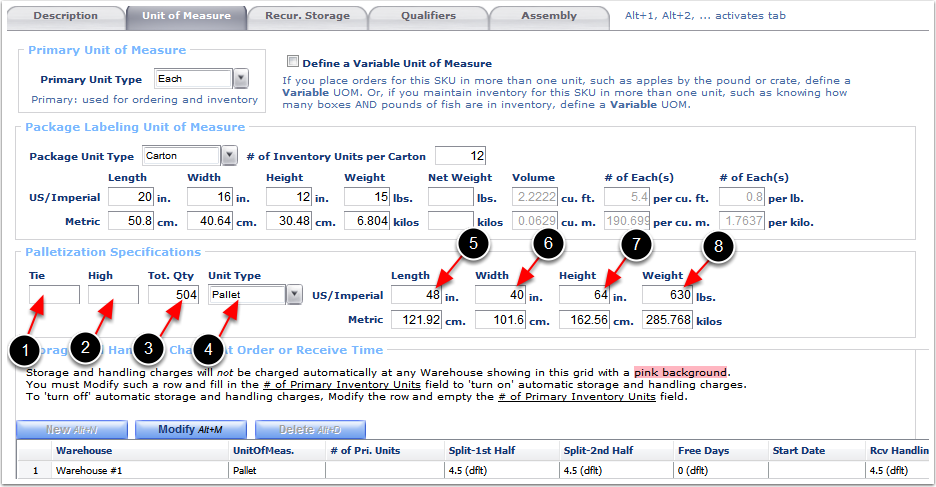
From the Unit of Measure Tab also update the Palletization Specifications for Movable Units(MU) by selecting the Palletization Unit Type, if applicable. To enable Movable Units for your warehouse contact support@3plcentral.com. Refer to the Admin - Movable Units user guide to create the palletization specification Unit Type.
Under Palletization Specifications update:
•Tie - (Optional) Enter the number of packages per layer of the palletization specification unit type.
•High - (Optional) Enter the High of the palletization specification unit type.
•Tot. Qty - (Required) Enter the number of primary units of measure that are contained in the palletization specification unit of measure.
•Unit Type - (Required) Select the Palletization Specification Unit Type. Refer to the Movable Units user guide to create the palletization specification Unit Type.
•Length - (Optional) Enter a standard Length of the product with the palletization specification Unit Type.
•Width - (Optional) Enter a standard Width of the product with the palletization specification Unit Type.
•Height - (Optional) Enter a standard Height of the product with the palletization specification Unit Type.
•Weight - (Optional) Enter a standard Weight of the product inside or stacked on top of the palletization specification Unit Type.
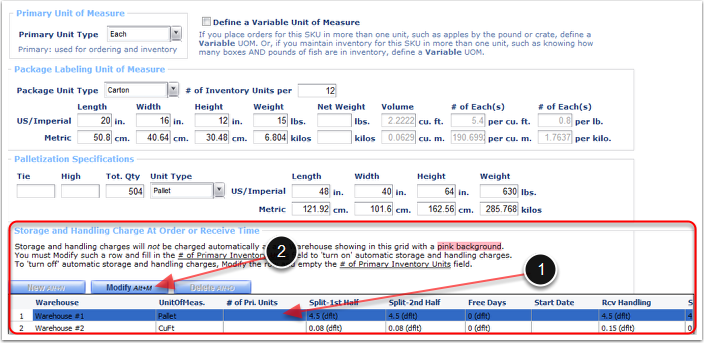
From the Unit of Measure tab you can Enable and Disable the Auto-Calculated Storage and Handling Rates At the time of Shpping and Receving. You can also overwrite the Default Auto-Calculated Storage and Handling Rates at Order and Receiving Time (Optional).
Important: The Auto Calculated Handling Unit of Measure Types should be created through the Customer - Billing Wizard. Refer to the Billing Wizard - System Calculated Storage and Handling Setup section of the Customer User guide for further instructions.
To enable, overwrite defaults or disable the Auto Calculated Storage and Handling Charges per SKU:
1.Highlight the row of the warehouse and unit of measure type to update.
2.Click Modify to open the Edit Storage and Handling Rate at Order or Received Time pop-up window.
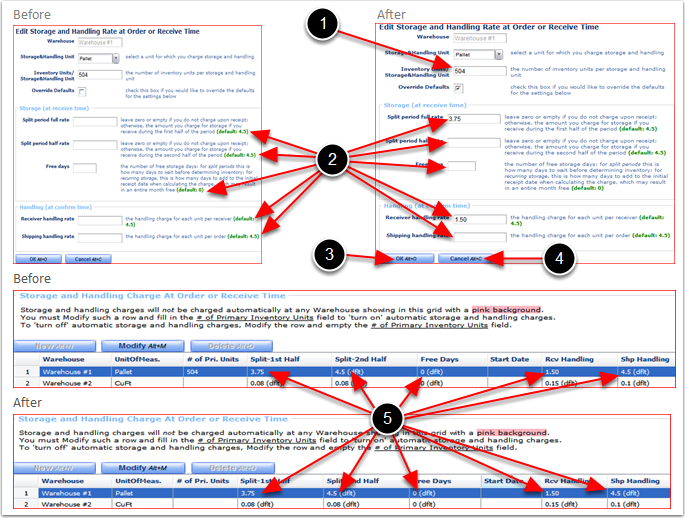
Unit of Measure Tab - Edit Storage and Handling Rate at Order Receive Time PopUp Window
To Enable the Default Auto-Calculated Charges from the Edit Storage and Handling Rate at Order or Receive Time pop-up window:
1.Enter the Inventory Units/Storage&Handling Unit - For this example the primary unit type of the SKU is Each, package unit type is Carton and we are setting the system to auto calculate the storage and handling charge at time of receiving and shipping by Pallet. If 12 eaches equal a carton and each pallet is palletized with 42 cartons, then the Inventory Units / Storage&Handling Unit is 504 eaches.
2.Default Rates setup - Refer to the Customer Billing Wizard - System-Calculated and Handling Charge Setup Guide to modify the Default Rates.
3.Click OK.
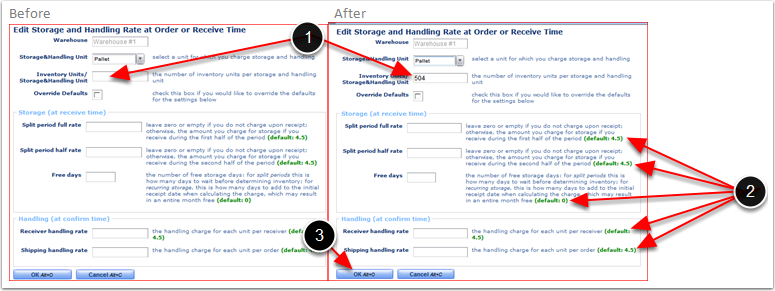
Storage and handling Charge At Order or Receive Time has been enable/modified, where the system will now auto calculate $4.50 for every 504 eaches at time of receiving and shipping.
4. Storage and Handling Charges will not auto calculate at time of receiving and shipping if the Inventory Units/Storage&Handling Units field is left empty. The system will auto populate this field after clicking OK.

Unit of Measure Tab - Edit Storage and Handling Rate at Order Receive Time PopUp Window
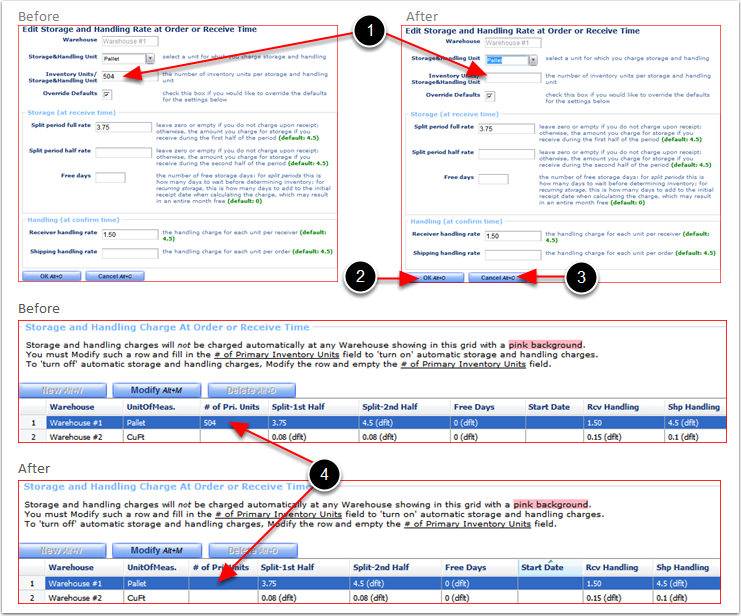
To Overwrite the Default Auto-Calculated Charges from the Edit Storage and Handling Rate at Order or Receive Time pop-up window for a specific Item or Kit Item:
1.Check the box Override Defaults.
2.Enter the Different from the Default Storage and Handling Charge to bill for the Item or Kit Item at the time of receiving and shipping (Optional). Refer to the Customer Billing Wizard - System-Calculated and Handling Charge Setup Guide to modify the Default Rates.
3.Click OK to save new changes and close the Edit Storage and Handling Rate at Order or Receive Time.
4.Clicking Cancel will not save new changes and will close the Edit Storage and Handling Rate at Order or Receive Time.
5.The system will show the New Rates entered.
To Disable the Auto-Calculated Charges from the Edit Storage and Handling Rate at Order or Receive Time pop-up window for a specific Item or Kit Item:
1.Remove the value entered in the Inventory Units/Storage&Handling Unit.
2.Click OK to save new changes and close the Edit Storage and Handling Rate at Order or Receive Time.
3.Clicking Cancel will not save new changes and will close the Edit Storage and Handling Rate at Order or Receive Time.
4.The system will show the Inventory Units/Storage &Handling Unit field empty.
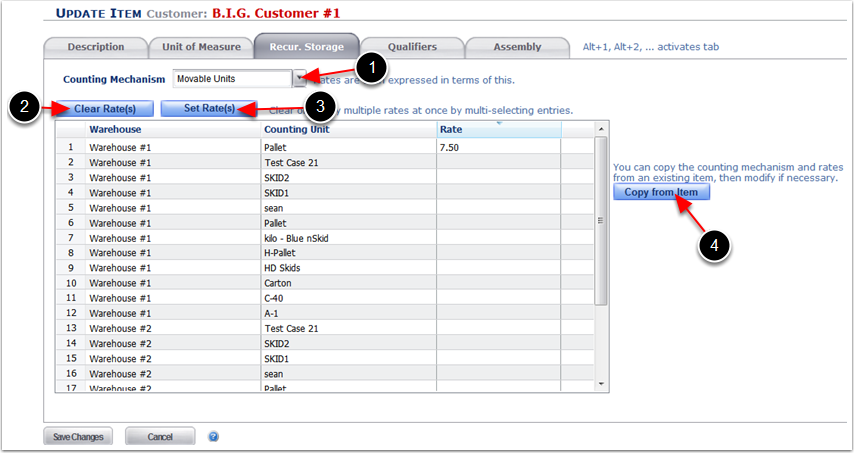
From the Recur. Storage Tab you can update the Recurring Storage Rates.
Storage UOM mechanism should be designated when billing by the Primary Unit of Measure or Package Labeling Unit of Measure. Refer to the Recur. Storage Tab section of this user guide for instructions on how to setup.
Editing Storage UOM Counting mechanism Parameters:
1.Click the dropdown arrow to change the Counting Mechanism.
2.Click the dropdown arror to change the Storage UOM used to Calculate the storage charge for the Item.
3.Change the number of primary units of measure that are contained in the storage unit of measure.
4.Use Clear Rate(s) to Clear any current Rate setup for a Warehouse.
5.Use Set Rate(s) to setup a New Rate of the same Warehouse Rate Cleared or to a different warehouse.
6.Use Copy from Item to copy the Rate setup of a different Item.
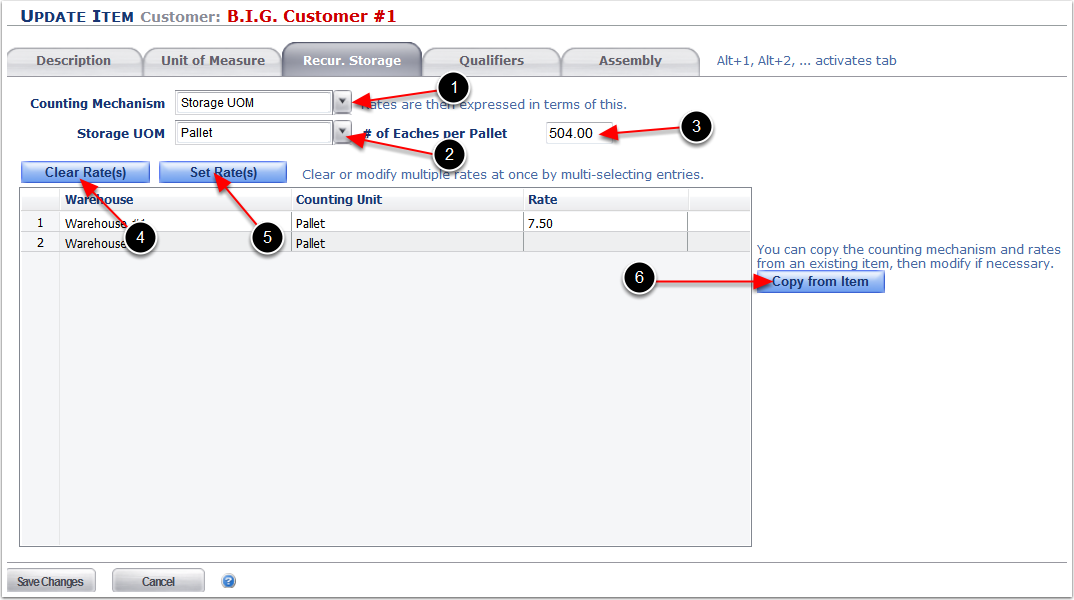
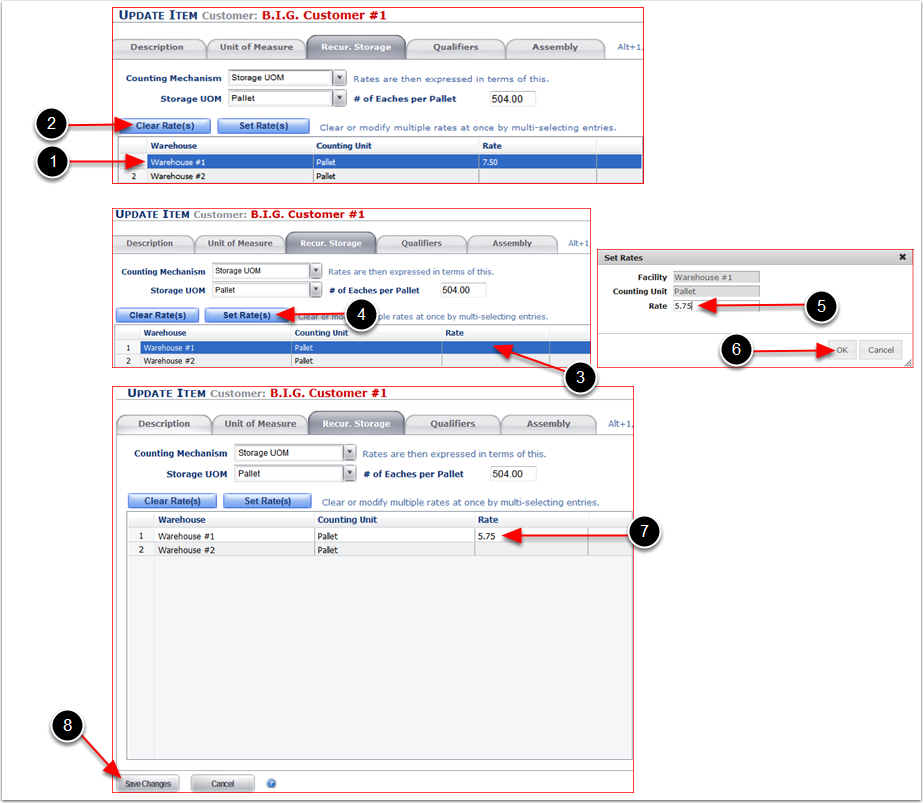
Edit Storage Unit Of Measure Counting Mechanism Example
1.Highlight the Counting Unit row that you will be modifying the Rates to.
2.Click Clear Rate(s).
3.Rates have been cleared.
4.Click Set Rate(s) to open the Set Rates pop-up window.
5.Enter the New Rate per storage unit of measure to charge each accrual period.
6.Click OK to save and close the Set Rates pop-up window.
7.New Rate will be displayed.
8.Click Save Changes to save changes and to go back to the Manage Items Main Screen.
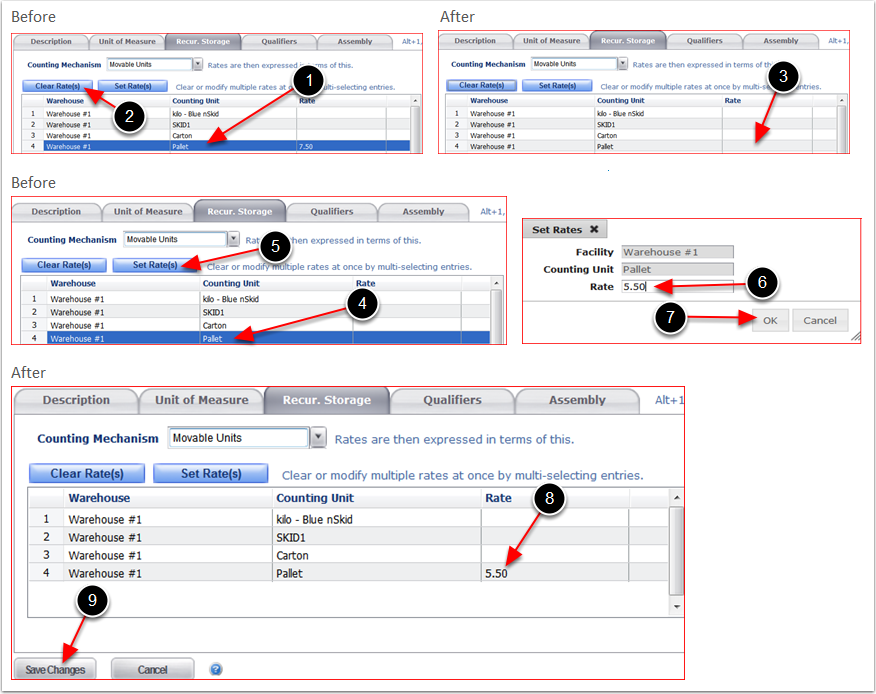
Movable Units (MU) Counting Mechanism should be designated when billing recurring storage based on the Movable Units (MU) On Hand such as pallets, gaylords or other unit of measures. Refer to Create Items - Recur. Storage Tab section of this user guide for instructions on how to setup.
Editing Movable Units Counting mechanism Parameters:
1.Click the dropdown arrow to change the Counting Mechanism.
2.Use Clear Rate(s) to Clear any current Rate setup for a Warehouse.
3.Use Set Rate(s) to setup a New Rate of the same Warehouse Rate Cleared or to a different warehouse.
4.Use Copy from Item to copy the Rate setup of a different Item.
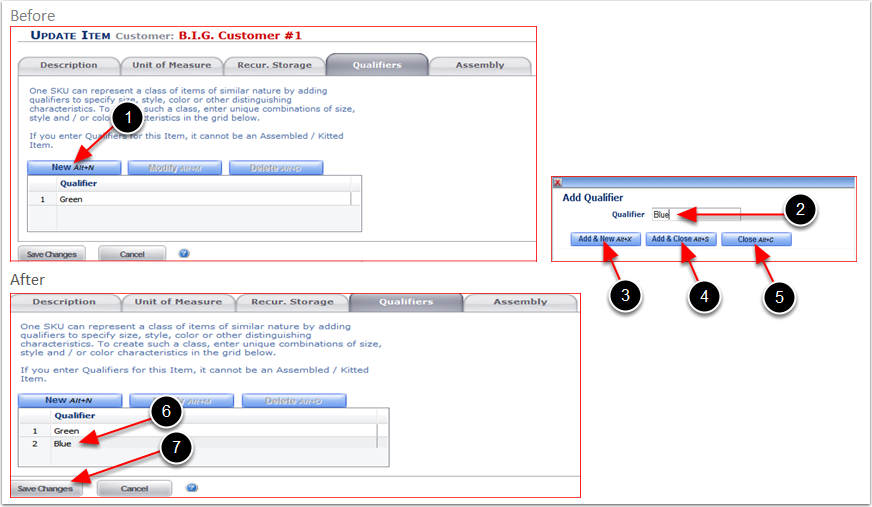
From the Edit Items - Qualifer Tab you can Add Qualifers for an Item., but you CANNOT Modify or Delete existing Qualifiers. Refer to the Manage Items - Edit Qualifiers section of this user guide to Modify or Delete exisiting Qualifiers of an Item. The Qualifier Tab allows you to enter an unlimited number of SKU level separations. This feature is useful for specifying size, color, or other distinguishing characteristics for an item.
Important! Qualifiers CANNOT be added to Kit Items.
To Add a New Qualifer to an Item:
1.Click New to open the Add Qualifier pop-up window will display.
2.Enter the New Qualifier.
3.Click Add & New if you will be creating more than one qualifier.
4.Click Add & Close if done entering all qualifiers for the Item and to close the Add Qualifier pop-up window.
5.Click Close to close the Add Qualifier pop-up window.
6.The New Qualifier added will display.
7.Click Save to save changes and to go back to the Manage Items Main Screen.
Edit Movable Units Counting Mechanism Example
1.Highlight the Counting Unit row that you will be modifying the Rates to.
2.Click Clear Rate(s).
3.Rates have been cleared.
4.Highlight the Counting Unit again to set the New Rate.
5.Click Set Rate(s) to open the Set Rates pop-up window.
6.Enter the New Rate per storage unit of measure to charge each accrual period.
7.Click OK to save and close the Set Rates pop-up window.
8.New Rate will be displayed.
9.Click Save Changes to save changes and to go back to the Manage Items Main Screen.
From the Assembly Tab you can Modify the following for a Kit Item:
1.Add a New Component Item to the Kit Item
2.Modify the setup of existing Component Items
3.Delete Component Items from a Kit Item
4.Update the Assembly Notes and Instructions.
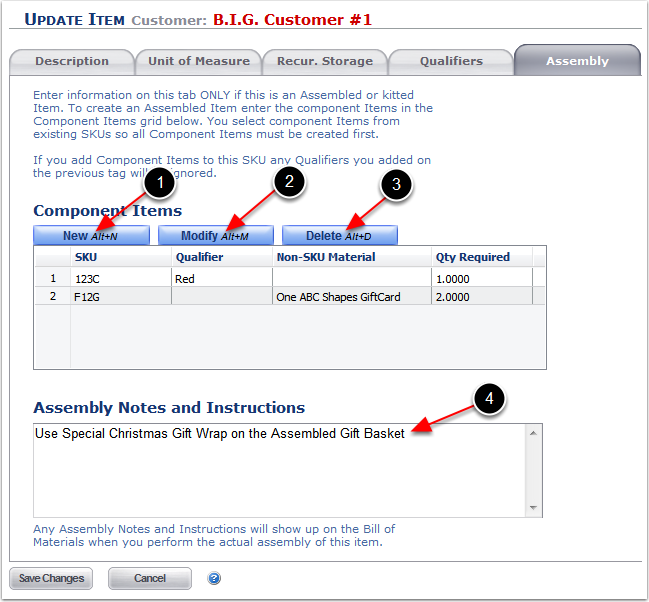
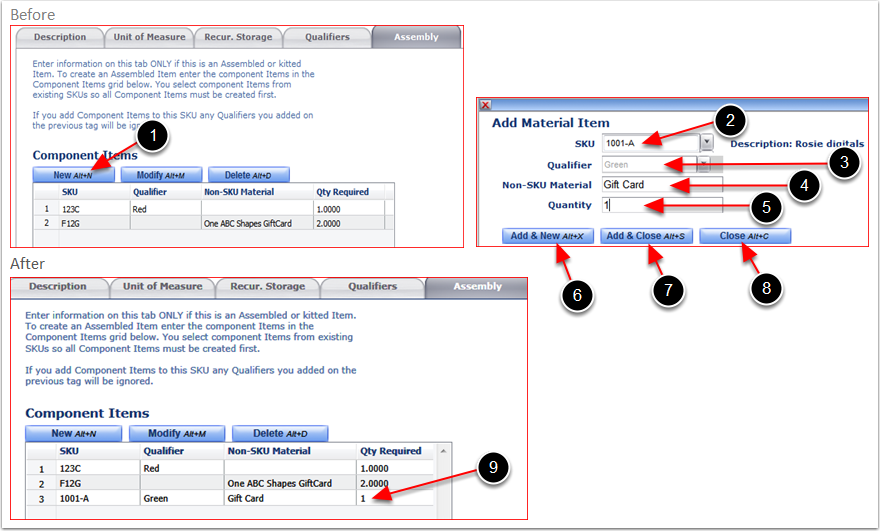
To Add a New Component Item to the Kit Item:
1.Click New to open the Add Material Item pop-up window.
2.Select the New Component SKU.
3.Select the Qualifier if the Component SKU selected has Qualifiers - Note! Qualifiers cannot be added to Kit Items, but Component Items can have Qualifiers. Refer to the Create Items - Qualifier Tab section of this user guide for instructions on how to setup.
4.Enter any accompanying items to the Component Item that is not inventoried in the Non-SKU Material field.
5.Enter the Refer Quantity to allocate of the Component Item.
6.Click Add & New to save the New Component Item add a another Component Item to the Kit Item.
7.Click Add & Close to save the New Component Item and close the Add Material Item pop-up window.
8.Click Close to not add the New Component Item and exit from from the Add Material Item.
9.New Component Item added will display.
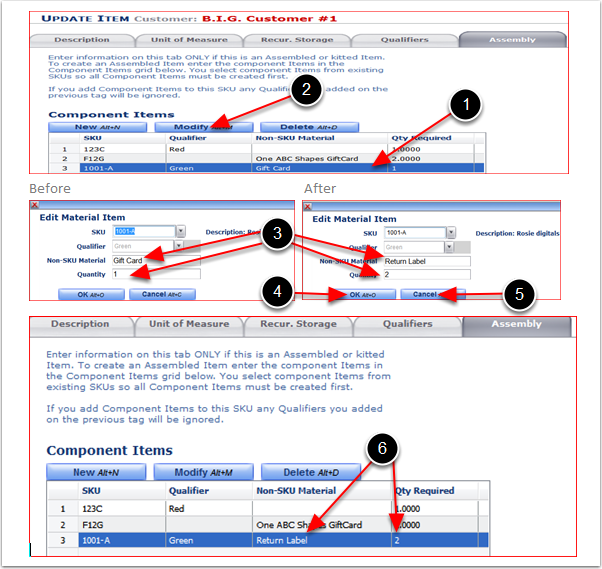
To Modify an existing Component Item of the Kit Item:
1.Highlight the Component Item to modify.
2.Click Modify to open the Edit Material Item pop-up window.
3.Make changes to the Component Item (In this example, the Non-SKU Material changed from Gift Card to Return Label and the Quantity changed from 1 to 2).
4.Click OK to save changes and close the Edit Material Item pop-up window.
5.Click Cancel to not save changes and exit from from the Add Material Item.
6.Changes will be displayed in the Component Items grid.
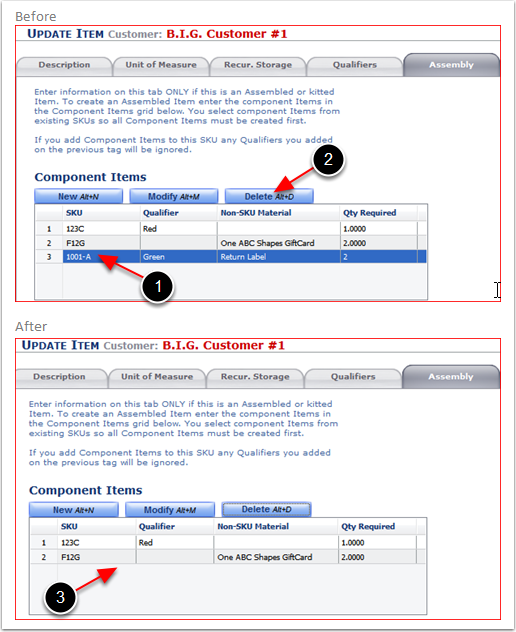
To Delete a Component Item from a Kit Item:
1.Highlight the Component Item to be deleted.
2.Click Delete.
3.The Component Item no longer appears.