Import Items |
  
|
Import Items |
|
The Item Import File feature facilitates importing a large number of new SKU's by batch uploading the item details from a single Text file. This Item Import User Guide shows how to create your own Item Import Template and also walks through proper format required to populate the Standard Item Import Template.
Refer to the Import Items - 3PLCentral Standard Item Import Template to learn about the Standard template. For instructions on how to import an Item file, refer to the Import Items - Import New Item File (Standard Item Import Template) section of this user guide.
To Import your Items, Review and Download the requirements to create your own Item Import template:
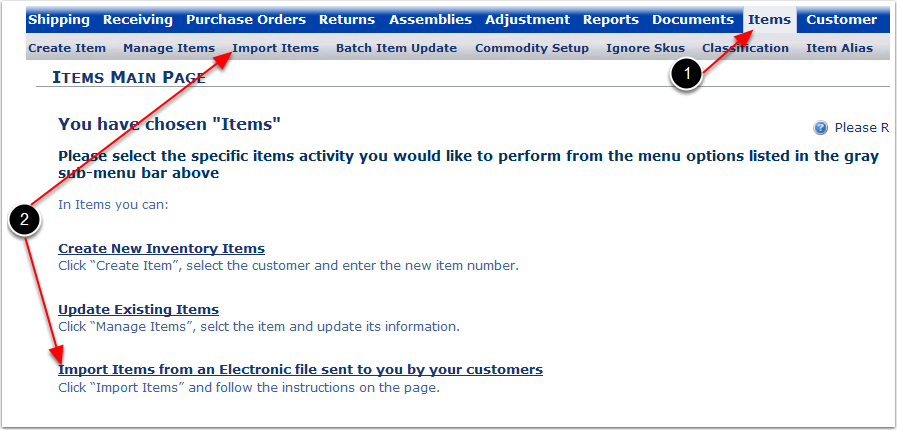
1.Navigate to Items found in the menu bar.
2.Click on Import Items from the submenu bar or click on Import Items from an Electronic file sent to you by your customers from the Items screen.
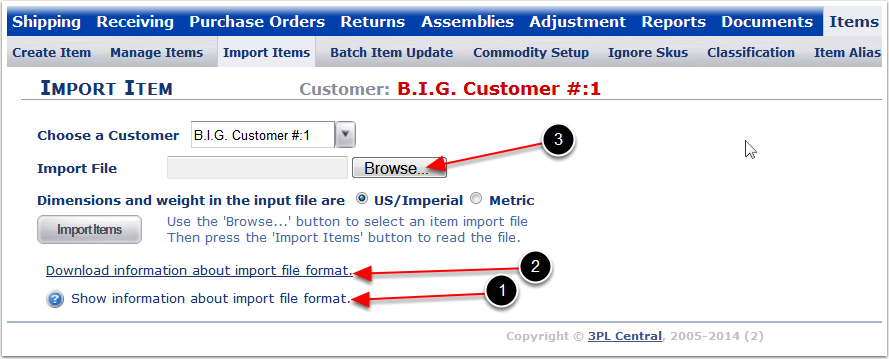
 From the Import Items Main Screen:
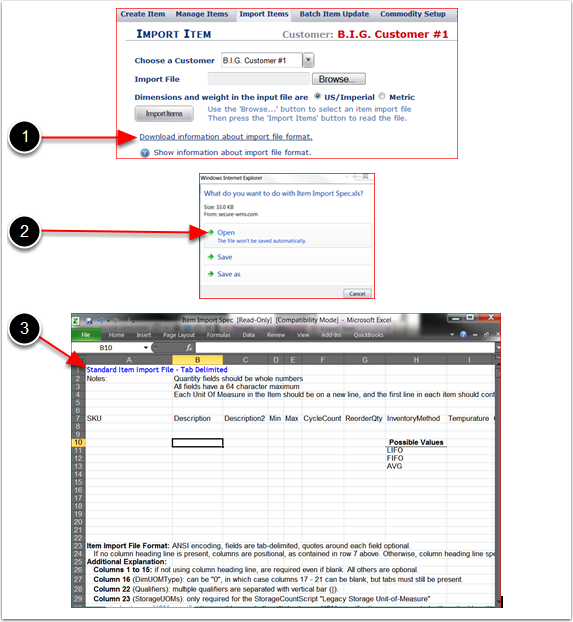
1.Review Information about the requirements to create your own Item Import file.
2.Download the information about creating the Item Import file.
3.Browse to Import the Item Import file.
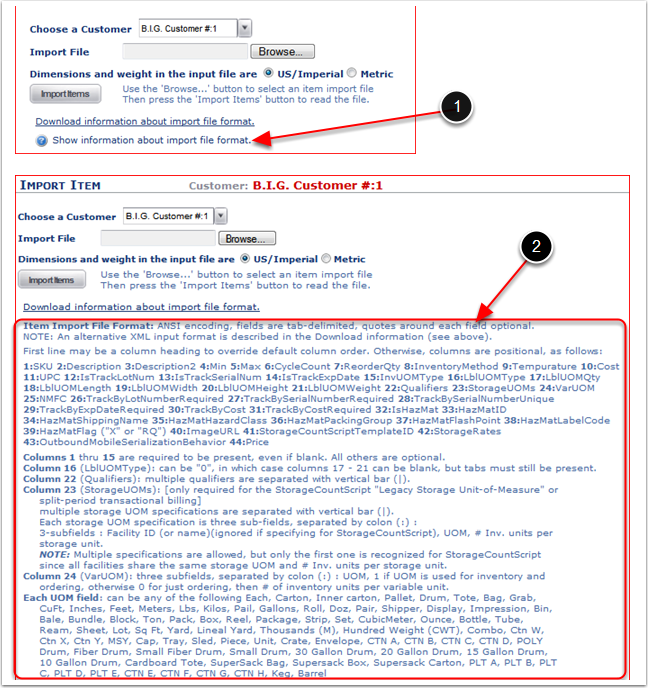
To Review the requirements to create the Item Import Template:
1.Click on the ? Show information about import file format link.
2.The system will display the Requirements to create the Item Import Template.
To Download the information on how to create the Item Import file:
1.Click on Download information about import file format to open the Microsoft Internet Explorer pop-up window.
2.Select Open from the Windows Internet Explorer pop up window to open the Item Import Specs excel sheet.
3.Use the Standard Item Import File - Tab Delimited information to create the Item Import File.
3PLCentral can provide a preformatted Item Import Template, contact support@3plcentral.com to obtain a copy of the Standard Item Import Template.
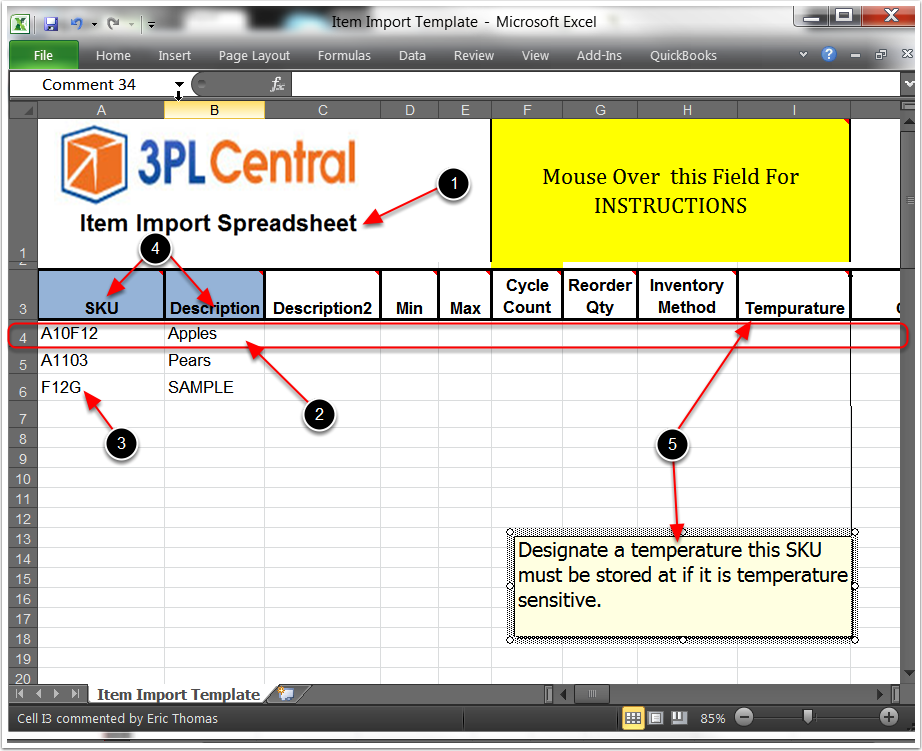
To populate a Standard Item Import Template, match all the fields from the Standard Item Import Template with the Create Items submenu selections in the System. Key requirements are:
1.All Items entered in a spreadsheet MUST be for the same Customer.
2.Each Row represents new Item.
3.All Items per Customer MUST be Unique.
4.Highlighted fields in Blue are Required fields for each Item.
5.Specific Instructions for each field can be found by mousing over the field and a comment with instructions will pop up.
The System screen shot is for reference only to help the user match the requested information in the Template with what is in the System. Note that not all information marked required in the Template is required when manually creating the Items. Any Items manually created will appear in the Manage Items Screen.
Information for 3PLCentral Standard Item Import Template is shown as follows:
Column A~K in the Item Import Template from the System Create Item - Description Tab
1.Column A = SKU - (Required) Enter a unique New SKU.
2.Column B = Description - (Required) Enter the first description of the SKU.
3.Column C = Description2 - (Optional) Enter a second description of the Item.
4.Column D = Min - (Optional) Enter a number to trigger the sending of a notification e-mail when inventory levels of this SKU drop below the entered value. To set up the Email Notification see the Customer Notifies section of the Customer user guide.
5.Column E = Max - (Optional) Enter a number to trigger the sending of a notification e-mail when inventory levels of this SKU rise above the entered value. To setup the Email Notification see the Customer Notifies section of the Customer user guide.
6.Column F = Cycle Count - (Optional) Enter a number to designate how many days can go by before a cycle count should be performed for this SKU.
7.Column G = Reorder Qty - (Optional) Enter a number to send out a notification e-mail alerting to re-order this SKU when the inventory reaches the given value. To set up the Email Notification see the Customer Notifies section of the Customer user guide.
8.Column H = Inventory Method - (Optional) To allocate inventory On Hand for this SKU to an order (FIFO, LIFO, FEFO). If a method is not specified, it will default to FIFO.
9.Column I = Temperature - (Optional) Enter the temperature this SKU must be stored at if it is temperature sensitive.
10.Column J = Cost - (Optional) Enter either the value of the item, or the landed cost associated with it.
11.Column K = UPC - (Optional) Enter the UPC number of the Item.
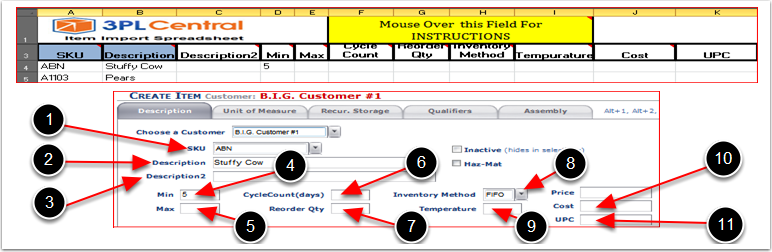
Column L~N & Y~AE in the Item Import Template from the System Create Item - Description Tab:
1.Column L = Track Lot - (Required) Enter TRUE if you want to assign Lot numbers to the SKU, enter FALSE if you do not want to assign Lot numbers to the SKU.
2.Column M = Track Serial - (Required) Enter TRUE if you want to assign Serial numbers to the SKU, enter FALSE if you do not want to assign Serial numbers to the SKU.
3.Column N = Track ExpDate - (Required) Enter TRUE if you want to assign Expiration Dates to the SKU, enter FALSE if you do not want to assign Expiration Dates to the SKU.
4.Column Y = NMFC# - (Optional) Type in the NMFC# of the SKU (IMPORTANT: The NMFC# MUST be set up through Commodity Setup found in the Items Submenu. Refer to the Commodity Setup section of this User Guide for further direction).
5.Column Z = Lot Number Required - (Required) Enter TRUE to make Lot numbers a requirement for the SKU, enter FALSE to leave Lot numbers optional.
6.Column AA = Serial Number Required - (Required) Enter TRUE to make Serial numbers a requirement for the SKU, enter FALSE to leave Serial numbers optional.
7.Column AB = Serial Number Must Be Unique - (Required) If Serial numbers have been activated for a SKU, enter TRUE here to Require Unique Serial numbers, otherwise enter FALSE.
8.Column AC = Exp Date Req - (Required) If Expiration Dates have been activated for a SKU enter TRUE to make them a requirement. Otherwise enter FALSE.
9.Column AD = Enable Cost - (Required) Enter TRUE to enable the Cost Track By, enter FALSE to disable it.
10.Column AE = Cost Required - (Required) Enter TRUE here to make the Cost Track By a requirement, otherwise enter FALSE.
Column O~U in the Item Import Template from the System Create Item - Unit of Measure Tab
1.Column O = Primary Unit of Measure (Primary UOM) - Enter the primary unit by which inventory will be tracked for the SKU. For example if you want to track at the individual piece level, enter EACH, see below for other Primary UOM and Packaging Unit Types.
2.Column P = Packaging Unit - Enter what the primary unit is packed into. If you do not pack the primary unit into a packaging unit, or are not concerned with keeping track of the packaging unit, enter the primary unit of measure again, see below for other Primary UOM and Packaging Unit Types.
3.Column Q = Packing UOM QTY - Enter the amount of primary units that are packed into a packaging unit.
4.Column R = Length - Enter packaging unit Length (Enter a 1 if Length is not relevant).
5.Column S = Width - Enter packaging unit Width (Enter a 1 if Width is not relevant).
6.Column T = Height - Enter packaging unit Height (Enter a 1 if Height is not relevant).
7.Column U = Weight - Enter packaging unit Weight (Enter a 1 if Weight is not relevant).
8.Net Weight - This is an optional field where the value MUST be entered manually in the System after Item has been created.
Accepted Values for Primary UOM and Packaging Unit Type:
Each, Carton, Inner, Carton, Pallet, Drum, Tote, Bag, Grab, CuFT, Meters, Lbs, Kilos, Pail, Gallons, Roll, Doz, Pair, Shipper, Display, Impression, Bin, Bale, Bundle, Block, Ton, Pack, Box, Reel, Package, Strip, Set, CubicMeter, Ounce, Bottle, Tube, Ream, Sheet, Lot, SQ FT, Yard, Lineal Yard, Thousands (M), Hundred Weight (CWT), Combo.

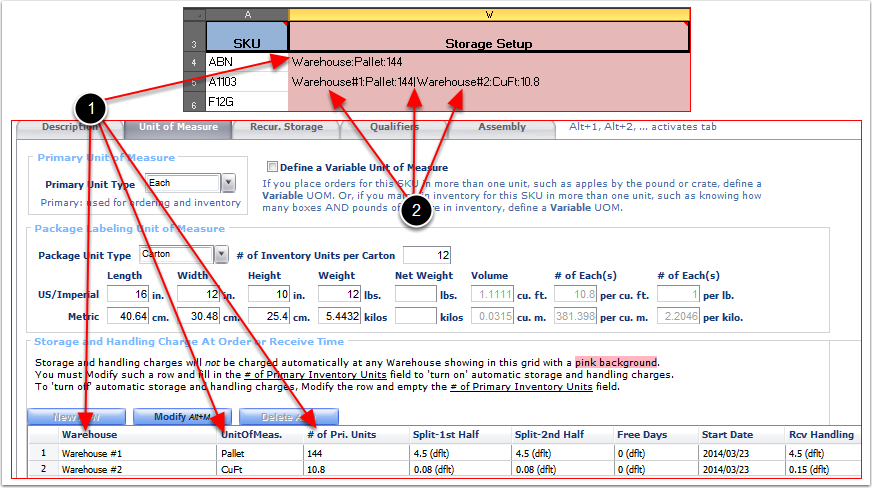
Column W in the Item Import Template from the System Create Item - Unit of Measure Tab
From Column W you can Enable the Auto-Calculated Storage and Handling Rates At Time of Shipping and Receiving (Optional). Refer to the Billing Wizard - System Calculated Storage and Handling User Guide for instructions on how to setup the Auto-Calculated Storage and Handling Rate At Time of Shipping and Receiving.
The general rules for populating Column W are:
1.Each storage UOM specification is three sub-fields, separated by colon (:):
a.Facility ID (Facility Name), UOM, # Inv. units per storage unit.
2.If there are multiple Warehouse Storage UOM specifications, each Storage UOM specification is separated by a vertical bar (|).
Example:
Warehouse #1:Pallet:144|Warehouse #2:CuFt:10.8
<Warehouse ID #>:<UOM>:<Number of UOMs per charge>
Important! Storage rates are setup under the Billing Wizard, refer to the Billing - System Calculated Storage and Handling Charge Set up for instructions.
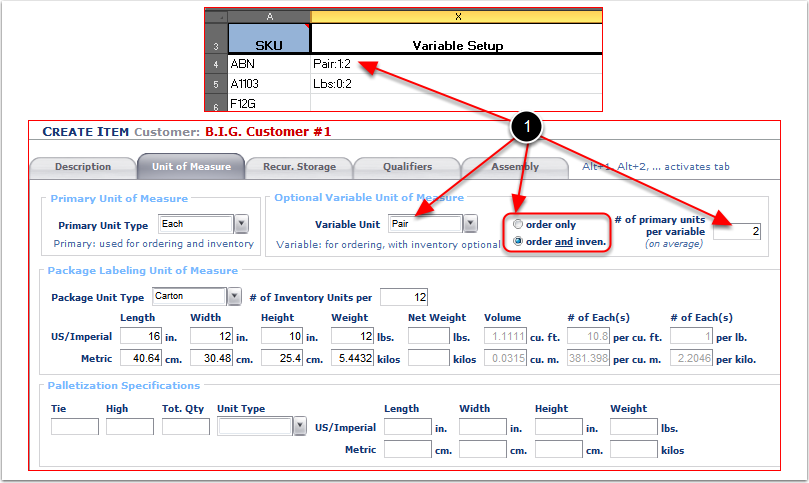
Column X in the Item Import Template from the System Create Item - Unit of Measure Tab
From Column X - Optional Variable Unit of Measure (Variable UOM) you can setup a Secondary UOM for a SKU (Optional). If you place orders for this SKU in more then one unit or if you maintain inventory for this SKU in more then one Primary Unit Type, then define a Variable UOM. The general rule for populating Column X is:
1. The Variable Setup field must consist of 3 sub-fields separated by a colon (:)
Unit Of Measure, Number 0 or 1 (where 0 stands for Order Only and 1 stands Order and Inventory defining if the variable will be used for Ordering only or for Receiving and Ordering), # of Primary Units per Variable
Example:
Pair:1:2
UOM:0/1:# of Inv. Units per Second Variable
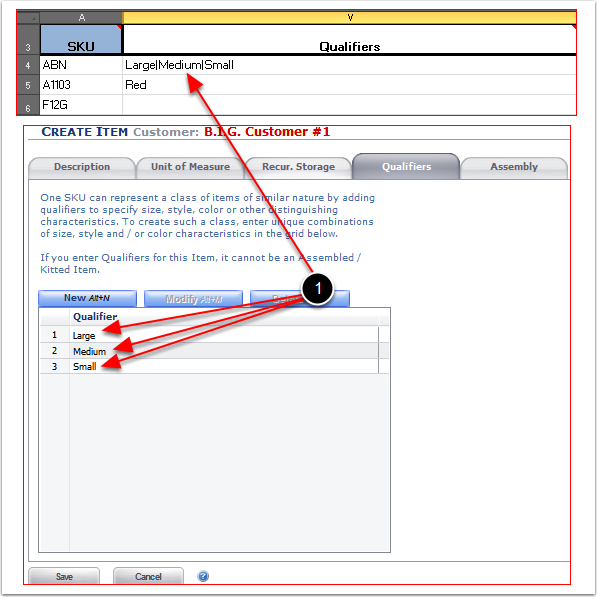
Column V in the Item Import Template from the System Create Items - Qualifers Tab
Column V - Qualifiers is useful to specify size, color, or other distinguishing characteristics of an Item.
The general rule to populate an unlimited number of SKU level separations is:
1. Separate an unlimited number of SKU level Qualifers with a vertical bar (|).
Example:
Large|Medium|Small
Qualifer|Qualifer|Qualifier
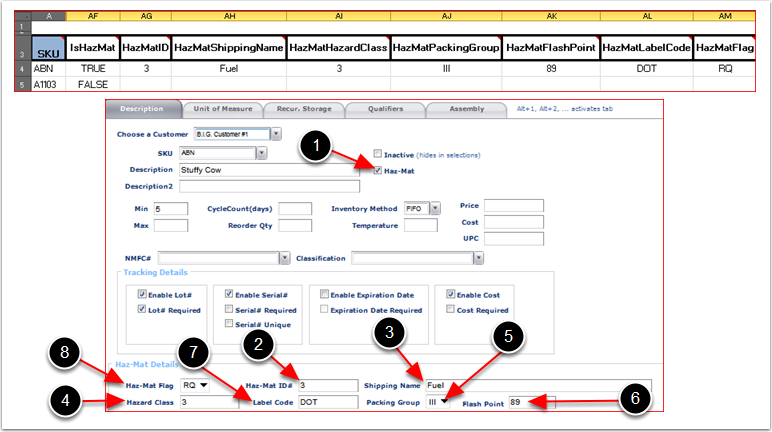
Column AF~AM in the Item Import Template from the System Create Item - Description Tab
Items can be defined as Hazardous Material (HazMat), refer to Create Items - HazMat section of this user guide for detailed definitions of the Hazardous Materials Identification Systems (HMIS).
1.Column AF = IsHazMat - (Optional) Enter True to define Item as hazardous material.
2.Column AG = HazMatID - (Optional) Enter the Items level of danger, 0 through 4, where 0 (zero) is the least dangerous and 4 being the highest level of danger.
3.Column AH = HazMatShippingName - (Optional) Enter a Name or Description of the Haz-Mat Items, it can be related to the shipment.
4.Column AI = HazMatHazardClass - (Optional) Enter the Hazardous Classification Number.
5.Column AJ = HazMatPackingGroup - (Optional) Enter the Hazardous Packing Group level of Danger, Possible Values are I, II, III, where I stands for High Danger, II stands for Medium Danger, III stands for Low Danger.
6.Column AK = HazMatFlashPoint - (Optional) Enter the combustible temperature of the product.
7.Column AL = HazMatLabelCode - (Optional) Enter Hazardous Label Code.
8.Column AM = HazMatFlag - (Optional) Enter X or RQ, where X is for Irritant or Harmful product and RQ is for Reportable Quantity if a reportable quantity of a Hazardous Substance is being shipped in a bulk packaging or a single non-bulk packaging.
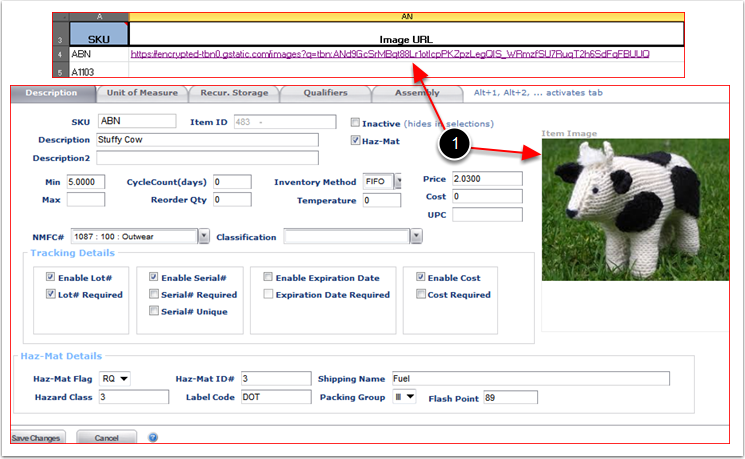
Column AN in the Item Import Template from the System Create Item - Description Tab
1. Column AN = Images URL - (Optional) Enter the Item Image URL Link to post the Item Image. Item Images are accessible to 3PL Central Customers who have Item Images enabled and users who have access to Item options. The Image size requirement is 262 X 262 pixels. If uploaded images do not meet this requirement, the images will scale up or down automatically. Refer to the Item - Item Images section of this user guide for more information on this feature.
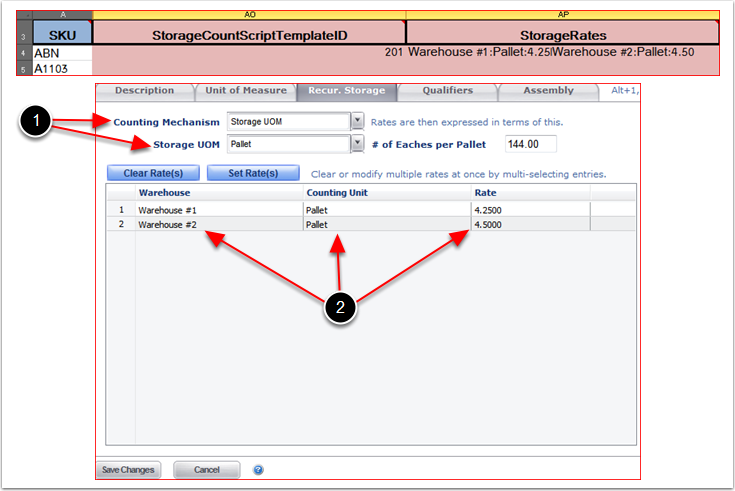
Column AO and AP in the Item Import Template from the System Create Item - Recur.Storage Tab
1.Column AO = StorageCountScriptTemplateID - (Optional) Enter 201 or 202 to setup the Recurring Storage Rate(s), where 201 is to setup the Recurring Storage based of the Storage UOM Mechanism, and 202 is to setup the Recurring Storage based of the Movable Units Mechanism. Refer to the Create Items - Recur. Storage Tab section of this user guide for more information on the Recurring Storage Mechanisms.
2.Column AP = StorageRates - (Optional) Used to setup the Counting Unit Type and Rate for the Recurring Storage Mechanism. Multiple specifications, separated by a vertical bar (|), each containing 3 subfields separated by colon (:) : Facility ID (or name), Count Unit, Rate.
For Example:
Warehouse #1:Pallet:4.25|Warehouse #2:Pallet:4.50
Facility ID (or name):Count Unit:Rate|Facility ID (or name):Count Unit:Rate
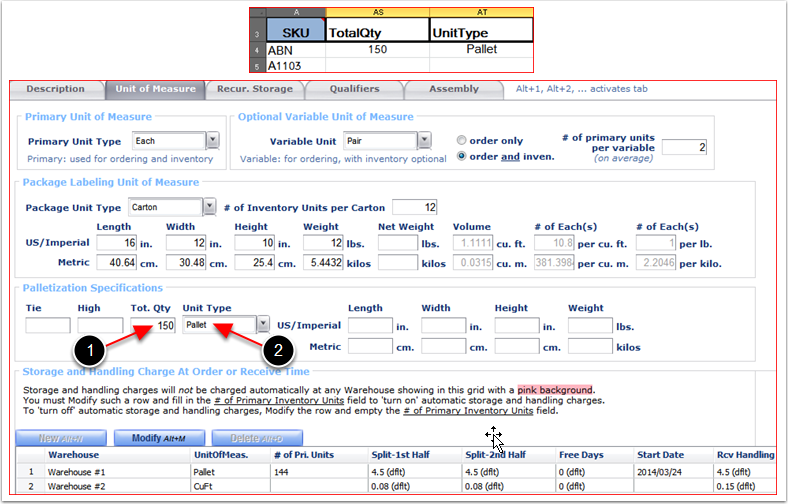
Column AS and AT in the Item Import Template from the System Create Item - Unit of MeasureTab
Movable Units (Palletization Specifications) can be enabled throught:
1.Column AS = TotalQty - (Optional) Enter the number of primary units of measure that are contained in the palletization specification unit of measure. Contact support@3plcentral.com to enable Movable Units for your warehouse. Refer to Create Items - Movable Units (MU) Setup section of this user guide for more information of this feature.
2.Column AT = UnitType - (Optional) Enter the Palletization Specification Unit Type. Refer to the Movable Units user guide to create the palletization specification Unit Type.
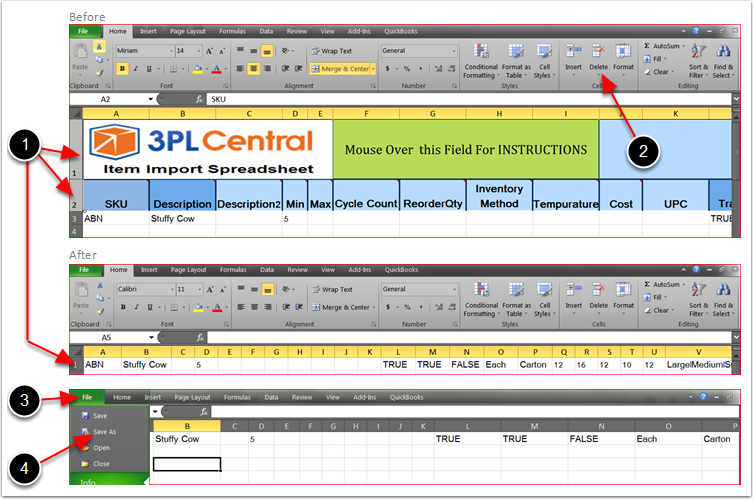
Once all values have been entered in the relevant fields per Item been created Save the file by:
1.Highlight the Header Rows 1 and 2 Only.
2.Click Delete to delete the top 2 rows.
3.Go to File.
4.Select Save As to open the Save As pop-up window.
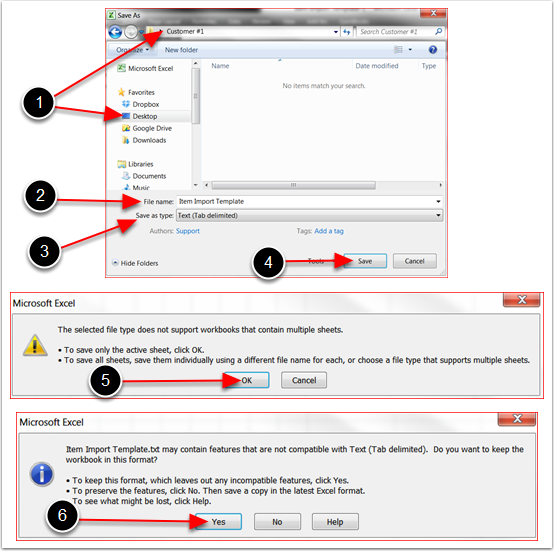
From the Save As pop-up window:
1.Navigate to the folder you want to Save the 3PL Central Standard Item Import Template (in this example we are saving to the Desktop Folder named Customer #1).
2.Give the File a Name.
3.Change the Save as Type to Text(Tab delimited) format.
4.Click Save and a Microsoft Excel pop-up will appear.
5.Click OK and a second Microsoft Excel pop-up will appear.
6.Click Yes to close the second Microsoft Excel pop-up and Save the file.
How to Import an Item File:
1.Navigate to Items found in the menu bar.
2.Click on Import Items from the submenu bar or click on Import Items from an Electronic file sent to you by your customers from the Items screen.
Note: In this tutorial to import an Item File, we will be importing the file 3PL Central Standard Item Import File saved in this user guide as opposed to an Item Import File created using the Information Reviewed or Downloaded from the Import Items Main Screen.

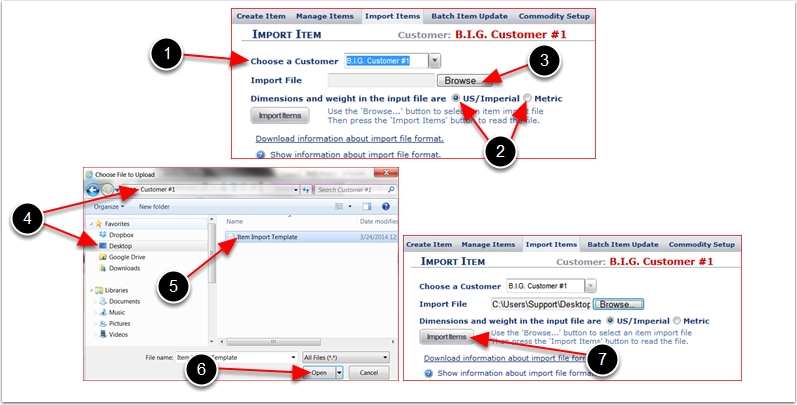
From the Import Items Main Screen:
1.Choose a Customer - Enter the Name of the customer or select the customer from the dropdown arrow. Items imported will all be associated with this customer Only.
2.The system will Auto-Default to US/Imperial measurements, click the Metric radio button to change the default setting to Metric Unit measurement.
3.Click Browse to open the Choose File to Upload pop-up window. Use the file navigation screen to locate and select the formatted data file previously saved.
4.Navigate to where the Item Import File was saved (In this example it was saved to the Desktop folder named Customer #1).
5.Highlight the Item Import File.
6.Click Open.
7.Click Import Items and the system will display the Items to be Created.
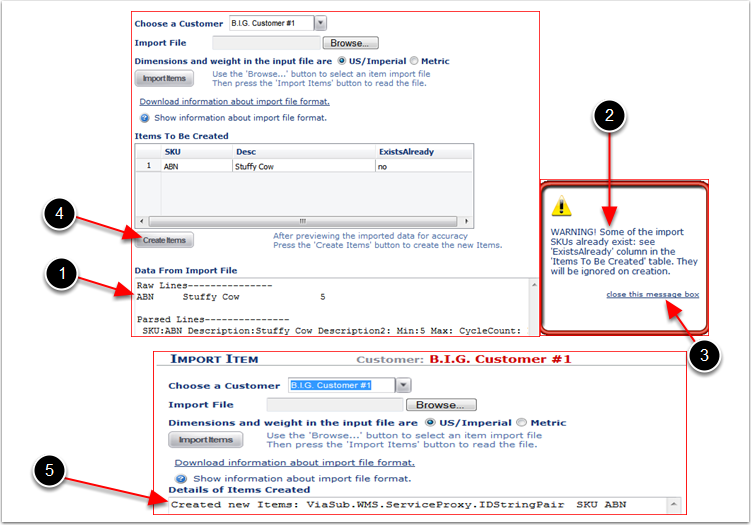
Items to Be Created
1.Review the Data From Import File.
2.The system will display an Warning pop message if Items To Be Created Exists Already.
3.Click Close this message box if Items exist already.
4.Click Create Items, any Items that exist already will be ignored and the system will create non-existing Items (Note: by NOT clicking Create Items the Items will not be created in the system).
5.System will display the Details of Items Created as a confirmation that of the Items created.
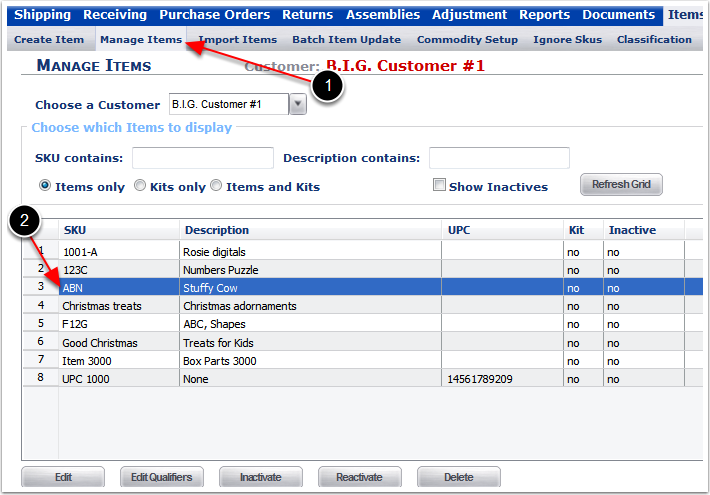
After importing the Item Import file:
1.Navigate to the Manage Items to review and verify the set up of the Item(s) created
2.The system will display the Item imported, refer to the Items - Manage Items user guide for instructions on how to manage existing Items.