Manage Open Order |
  
|
Manage Open Order |
|
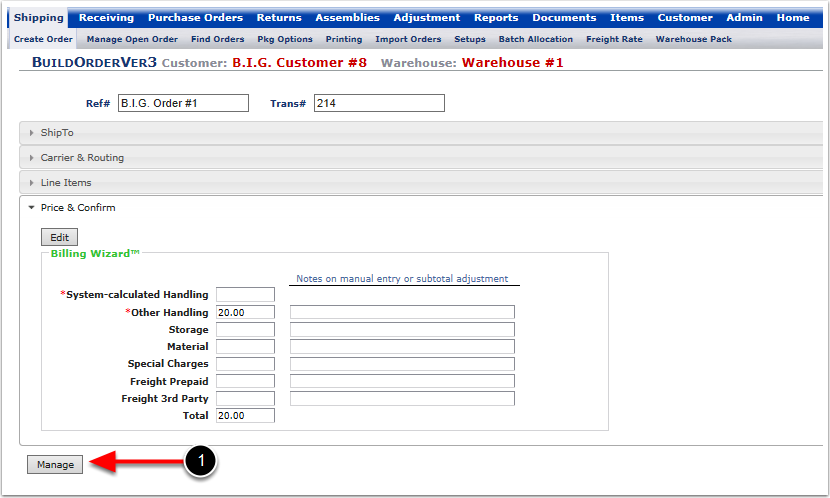
Once you are complete all the sections on the BuildOrderVer3 Screen:
1. Choose Manage. The system will take you to the Manage Open Screen.
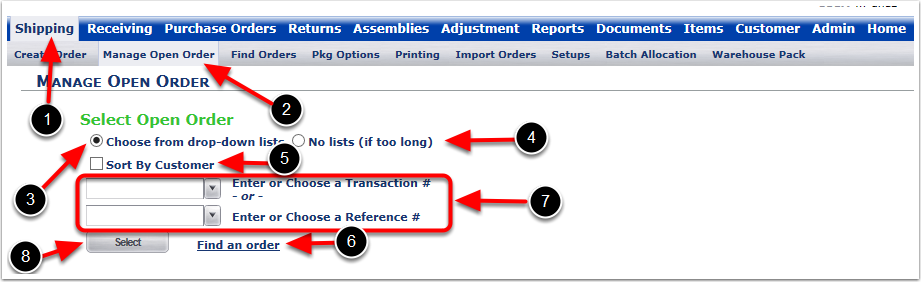
In order to access an open order to print reports and make any necessary edit, follow the steps below:
1.Choose Shipping.
2.Choose Manage Open Order.
3.Choose the option Choose from drop-down lists if you would like the drop-down options available.
4.Choose No lists (if too long). This option is a good option for users who know their transaction number already and they prefer the option of typing up the transaction number or the reference number intead of choosing from the drop-down menu.
5.Choose Sort By Customer if you would like the drop down menu options to be sorted by the customers name.
6.Choose Find an order if you wish to navigate to Find order Screen.
7.Choose your order from the drop-down menu option.
8.Choose Select.
Once select is picked the system takes the user to the Manage Open Order screen where one can print reports and enter charges and confirm your shipment.
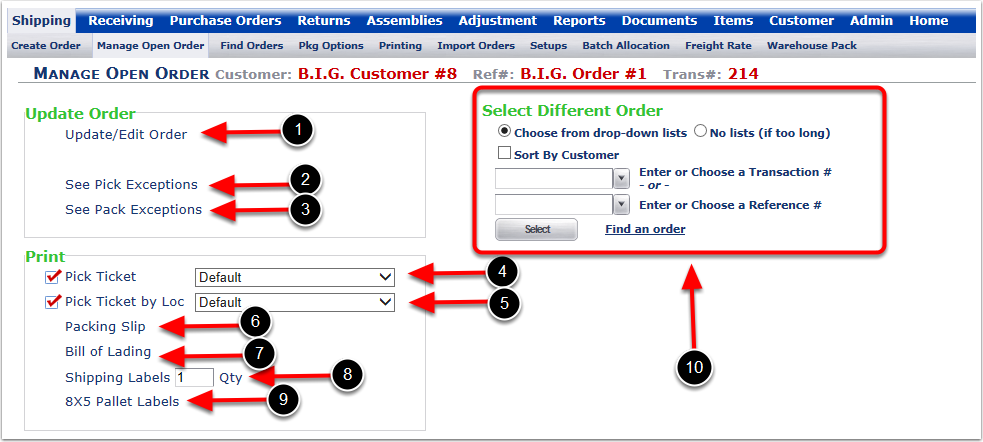
Once you Create an Order and hit Manage, the system will take you to the Manage Open Order Screen. The Manage Open Order is used to Print Pick Ticket, Pick Ticket by Loc, Packing Slip, Bill of Lading, Shipping Labels and to confirm Orders. An important note to keep in mind is that an order is still not completed until you Enter Charges and Confirm a shipment.
1.Use Update/Edit Order to make any changes to the existing order
2.Use See Pick Exceptions to be used with the Mobile Scanning Feature. Refer to Mobile Scanning Feature for more information.
3.Use See Pack Exceptions to be used with Mobile Scanning Feature. Refer to Mobile Scanning Feature for more information.
4.Use Pick Ticket to print the Pick Ticket of the order
5.Use Pick Ticket by Loc to print the Pick Ticket which is sorted by location
6.Use Packing Slip to print the Packing Slip of the order
7.Use Bill of Lading to print the Bill of Lading of the order
8.Use Shipping Labels to print Labels with Ship From and Ship To address of the order
9.Use 8X5 Pallet Labels to print the pallet labels of the order
10.On the right side of this page, there is an option to Select Different Order if you wish to modify a different order.
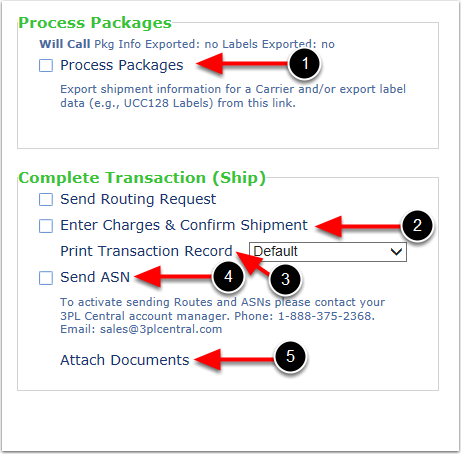
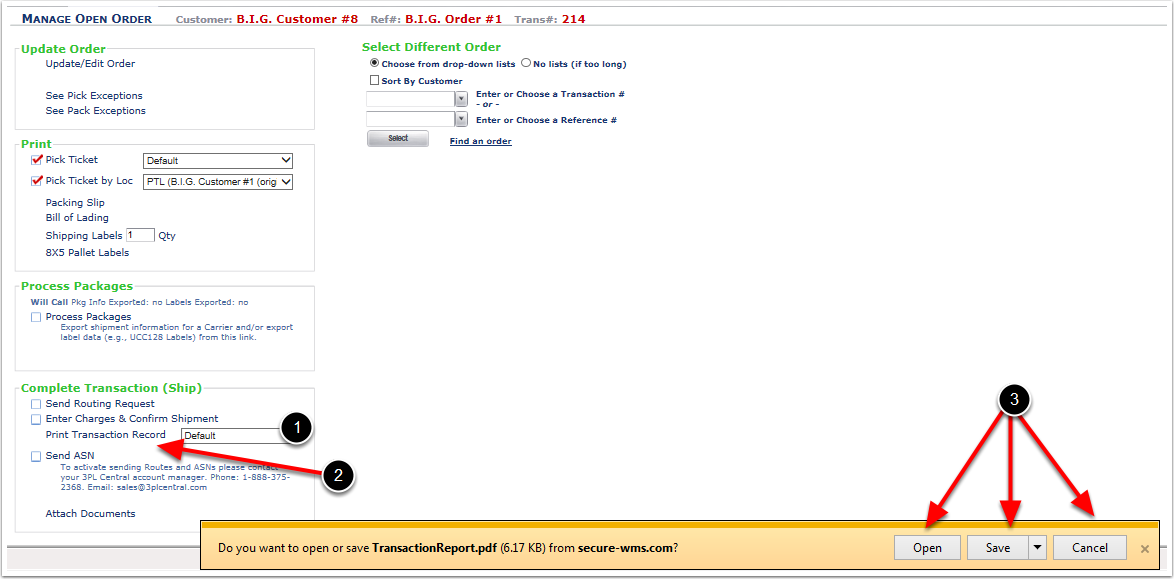
Once you Create an Order and hit Manage, the system will prompt you to the next screen where you can:
1.Use Process Packages to consolidate packages, edit or for EDI.
2.Use Enter Charges and Confirm Shipment to complete the order.
3.Use Print Transaction Record to view transaction report.
4.Use Send ASN to send ASN for API and EDI refer to API and EDI section of this User Guide.
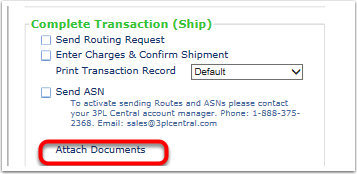
5.Use Attach Documents to add attachments to the order.
Process Packages is mainly used to consolidate orders. You can also use this option for some EDI functionality. Refer to the EDI section of this User Guide for more information on this section. To consolidate packages, follow the steps below:
1. Choose Process Packages and the system will prompt you to Packages Screen.

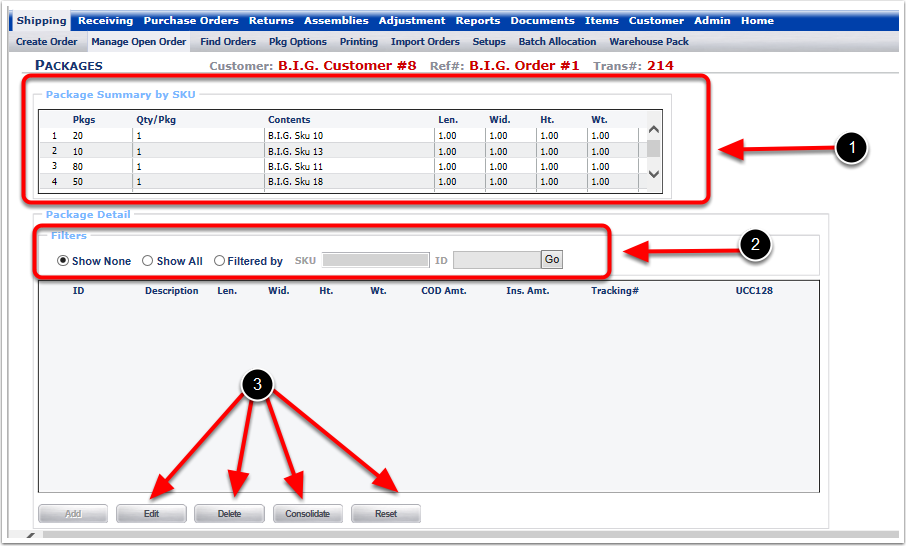
This screen is mainly used to consolidate your packages.
1.This section lists packages, quantity, SKU's and Length, Width, Height, Weight.
2.These are the filter options. You can filter according to what you are trying to accomplish.
3.This is where you perform the action. You can Edit, Delete, Consolidate and Reset.
Refer to the following screen for an example.
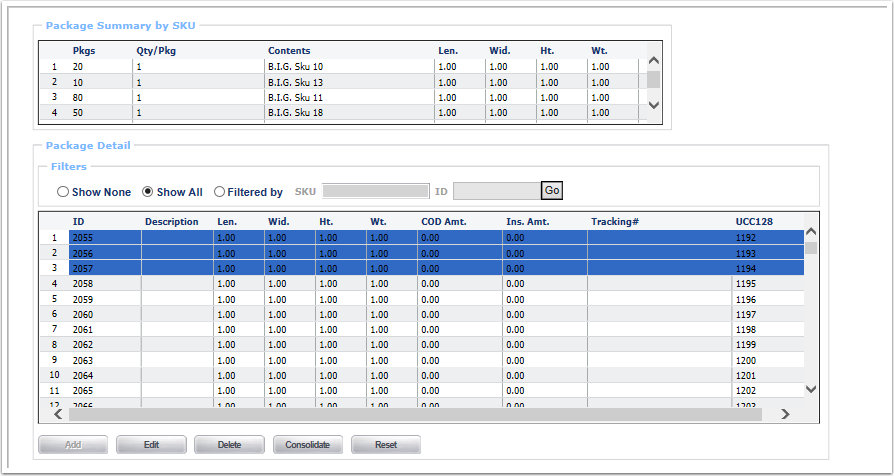
In order to consolidate line item into a package, follow the steps below:
1.Choose Show All.
2.Choose the line items you would like to consolidate.
3.Choose Consolidate.
The system will take you to the Package Edit Screen where you can add more information about your package.
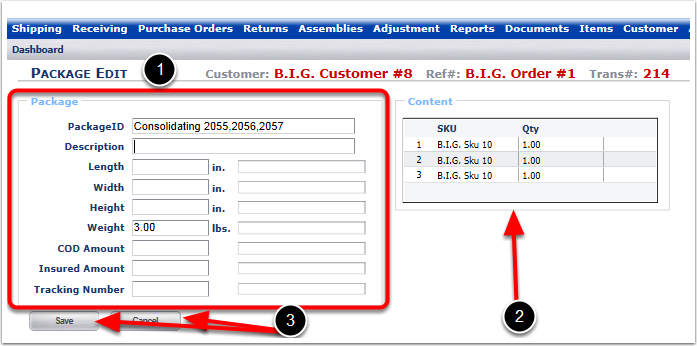
You can add any information about your package on this screen
1.This is all free form and you can type in any information here. There are several options available for you here.
2.Here you have the lists the SKU's you are trying to consolidate for reference.
3.Once done adding information to your package, you can choose Save or Cancel.
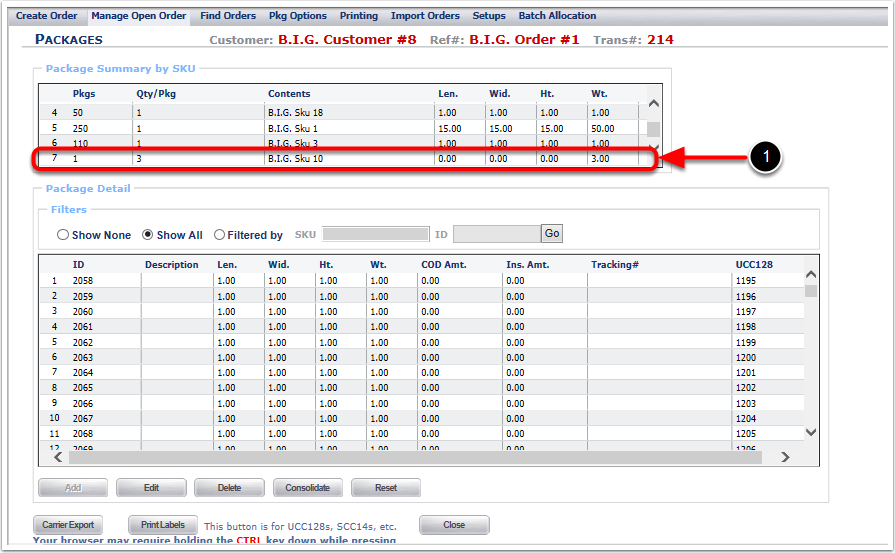
The system will take you back to the Packages Screen.
Back to the packages screen you will be able to see the package you just created under Package Summary by SKU.
1.Here you can see the new package we just created.
2.Now you can consolidate more packages exit the screen by Choosing Close. In this instance we will choose Close and the system will prompt us to the Manage Open Order Screen.
Note: For more information on Carrier Export and Print Labels, refer to the EDI documentation of this User Guide.
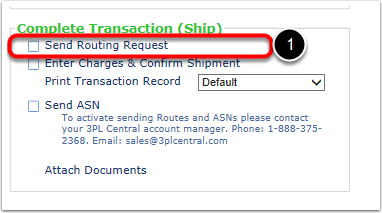
Refer to the EDI section of this User Guide for more information on Send Routing Request.
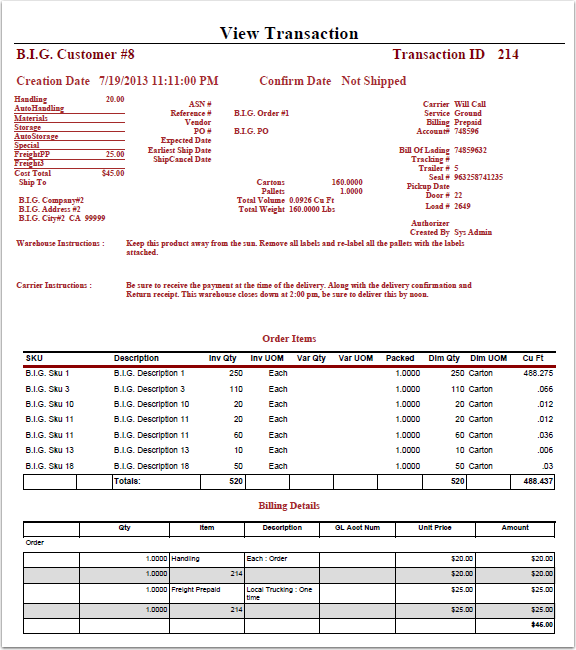
The next option available for a user is to print the Transaction Record Report. This report provide a summary of the order.
1.Choose the report definition. You will have more options available here if you have any customized reports for Transaction Record. In this instance we will choose Default version of the reports which is the standard version.
2.Choose Print Transaction Record.
3.Choose Open, Save or Cancel.
The screen below shows the sample Transaction Record generated. This is new pop attachment of pdf, once on this screen you are able to print this PDF. In this instance we will close it and continue to process our order on the Manage Open Order Screen.
Refer to the EDI section of this User Guide for more information on Send ASN.

Refer to the document section of this User Guide for more information on Attach Document.
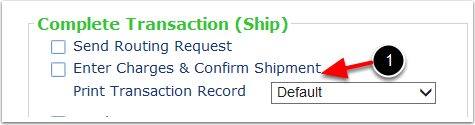
To confirm an order the final step is to, Enter Charges & Confirm Shipment:
1. Choose Enter Charges & Confirm Shipment.
The system will go back to the BuildOrderVer3 screen.
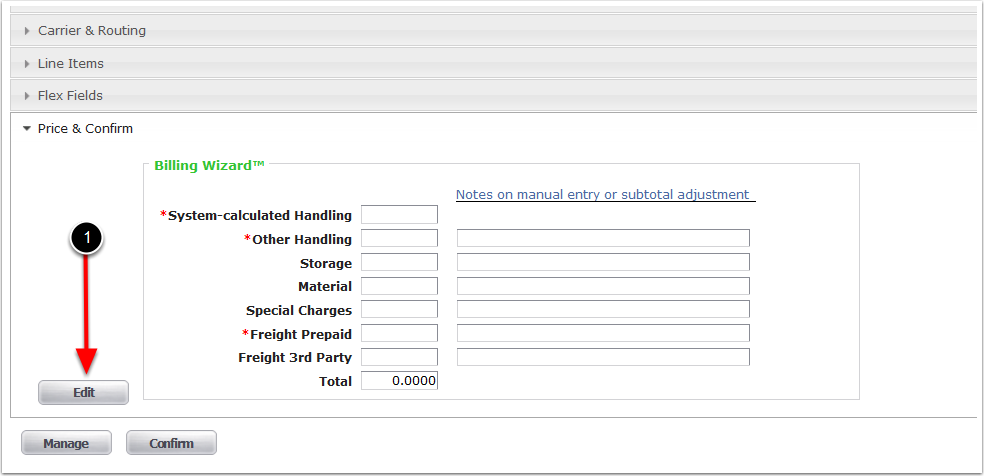
From the Price & Confirm option, enter charges and confirm the shipment:
1. Choose Edit.
The system will go to the price screen.
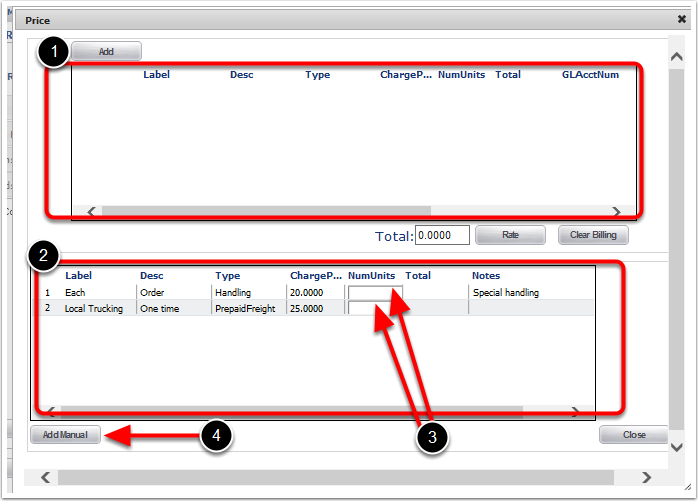
From the Price Screen add charges manual. Automatic charges set up in Billing Wizard will aldo be listed on this screen.
1. All Automatic charges will be listed here.
2. All Manual charges will be listed here.
3. We will add "1" to both Manual charges.
4. Choose Add Manual.
This will update the Price screen to show the charges. Refer to the following page.
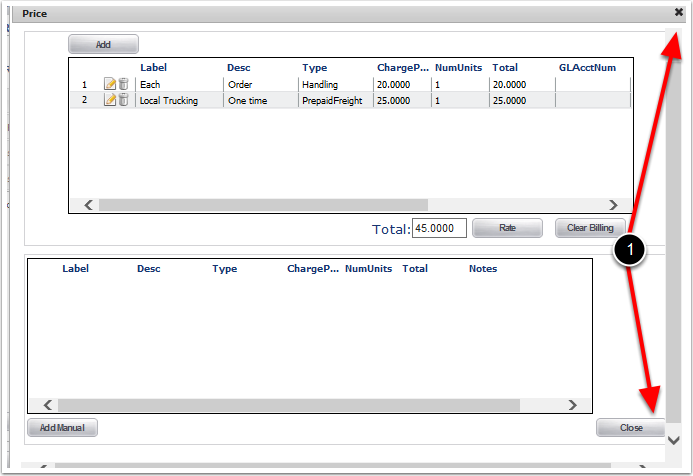
The Price Screen will display the Manual charges in the top box. Now you will need to close out of this to continue on with this order,
1. Choose x or close and this will take you back to create order screen.
The Price and Confirm tab presets with the added data. To confirm order:
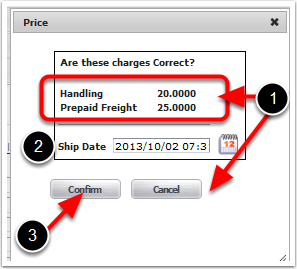
1. Choose Confirm and a Price pop up will appear.
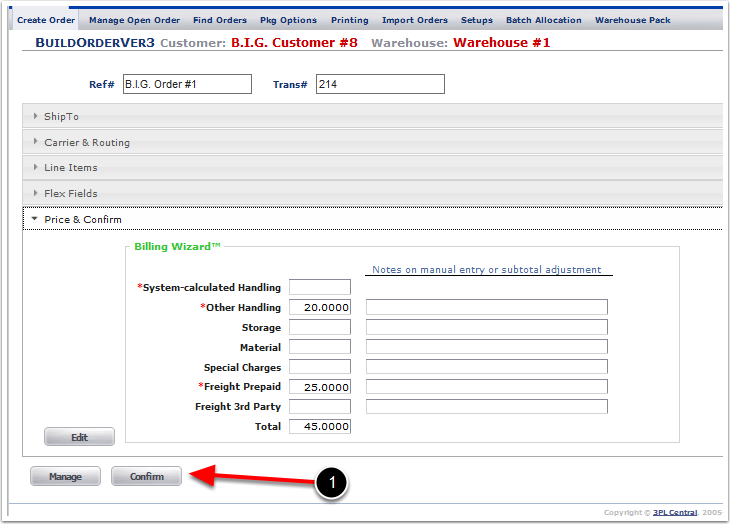
There are two important parts on this screen:
1.It is important to make sure that pricing is correct and if its incorrect we should choose cancel instead of confirm.
2.The Ship Date is a very important date. This will be the date the system will stamp as the status "Shipped". Another way to look at this is if a customer has storage set up then the system will charge storage up til this date.
3.Once a Ship Date is selected, choose Confirm and the system will take you back to Manage Open Order Screen.
*Note: if you are confirming an order late, please make sure that you select the correct Ship Date on this screen.
On this screen you can do the following now:
1.Print any reports.
2.Work on a different order.
3.Note that there is red check by the Enter Charges & Confirm Shipment. This red check shows that this order has been confirmed. In other words, the inventory has been taken out of the system and shipped on this order.
