Notification |
  
|
Notification |
|
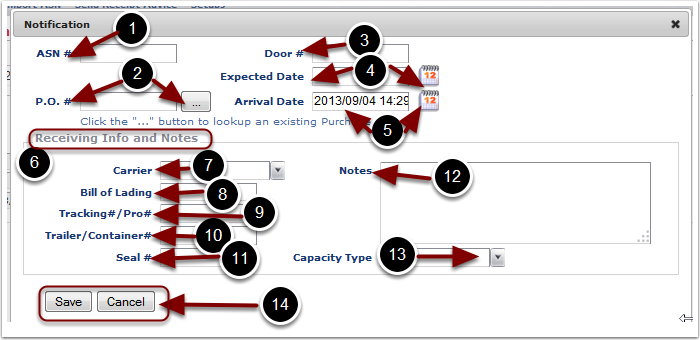
1.ASN# - Enter an Advanced Shipment Notice# for the inbound shipment
2.P.O.# - Enter or Select the Purchase Order number associated with this receipt. Identifying the Purchase Order number on the Receiver will enable PO progress to be tracked. More information is on the Notification PO Popup screen.
3.Door # - Enter a dock Door # for the inbound shipment.
4.Select an Expected Arrival Date at the warehouse for the inbound shipment.
5.Select the actual Arrival Date at the warehouse of the inbound shipment.
6.In the Receiving Info and Notes section, specify:
7.Carrier - In the drop down list, choose the Carrier who delivered the freight to the warehouse. Refer to the Admin/Update Carriers sub menu option for more information on defining Carriers.
8.Bill of Lading - Enter a Bill of Lading for the inbound shipment.
9.Tracking#/Pro# - Enter carrier Tracking# or Pro# for the inbound shipment.
10. Trailer/Container# - Enter the Trailer or Container number for the inbound shipment.
11. Seal# - Enter the Container/Trailer Seal number for the inbound shipment.
12. Notes - Enter any additional receiving info and notes to help identify the inbound shipment.
13. Capacity Type - Select the type of equipment that the inbound shipment arrived in.
14. When finished entering data into the Notification section, select the Save button to Save the data or Cancel button to exit. Saving will automatically open the next accordion section.