Once Line Items have been added to a Receiver, there are two ways to Receive Against the Receipt (assign/put away the inventory to a location):
•Manually in the UI
•Via Mobile Device
To assign the inventory to a location after it has been related to a Receiver using a Mobile Device:
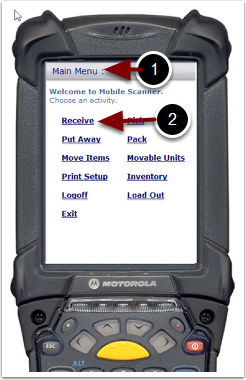
1.Refer to the Mobile guide and navigate to the Main Menu.
2.Select the Receive link. The system will take you to the Rcv: Trans. ID menu.
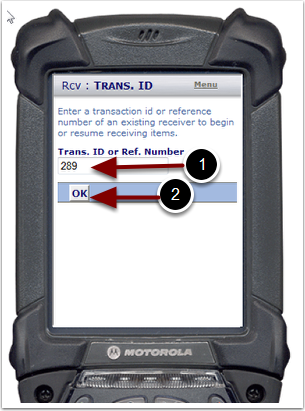
To Assign Locations to the product:
1.Type in the Transaction Id/Reference Number that has already been created in the User Interface (manually or by file import via Import ASN)
2.Select OK to save the selection. The system will take you to Mobile Rec: Info Screen
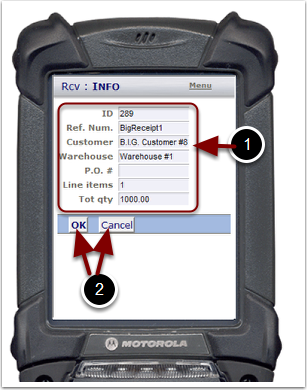
Review the Receiver Information:
1.View the Receiver Info as pulled from the Receiver created in the UI. This information can only be edited in the UI. (See Create Receiving-Line Items Information for help with editing.)
2.Select OK to save the selection and the system will take you to the Mobile Rcv: Location screen. Otherwise select Cancel to exit.
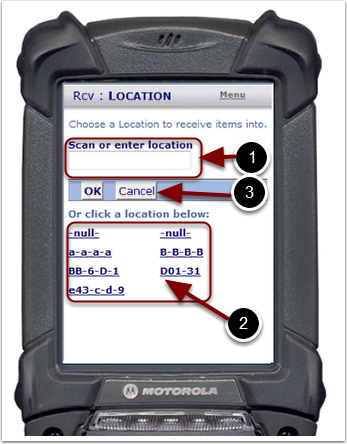
Define a Location to receive items into. This can be accomplished by:
1.Scanning with the mobile or entering in the location OR
2.Selecting the location link in the displayed list
3.Select OK to save the selection and the system will take you to the Mobile Rcv: SKU screen. Otherwise select Cancel to exit.
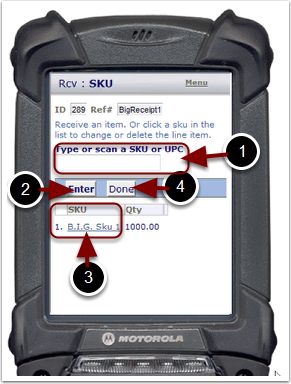
Define a SKU to be received into the location defined. This can be accomplished by:
1. Scanning the item SKU or UPC with the Mobile, OR typing in the SKU or UPC
2. Select Enter and the user will be taken to the Mobile Rcv: Edit Screen
3. OR Select the SKU link from the list and the user will be taken to the Mobile Rcv: Edit Screen
4. Selecting Done will return the user back to the Mobile Rcv: Done screen
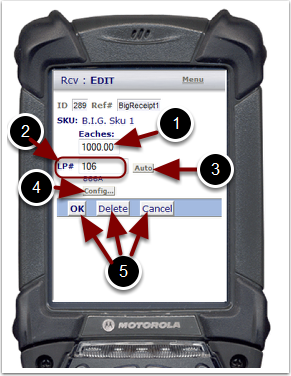
Define the Item quantity to be received into the specified location. This can be accomplished by:
1. Type the number of units into the Eaches box. The word Eaches represents the unit of measure defined for the item. This field might display Carton, Drum, etc, depending on the specific item setup. Refer to the Manage Items guide for details.
2. If Movable Units are enabled for this customer, type in the LP# (License Plate or Movable Unit label)
3. Select the Auto button to have the system automatically define a Movable Unit label
4. Select the Config button to review the specifications of the Movable Unit
5. Select OK to save the QTY, SKU, Location, LP# selection and complete the Receiving. Select Delete to remove the Eaches and LP# entry or Cancel to return to the Mobile Rcv: SKU screen.
