Customer Tab |
  
|
Customer Tab |
|
From the Create Customer Page:
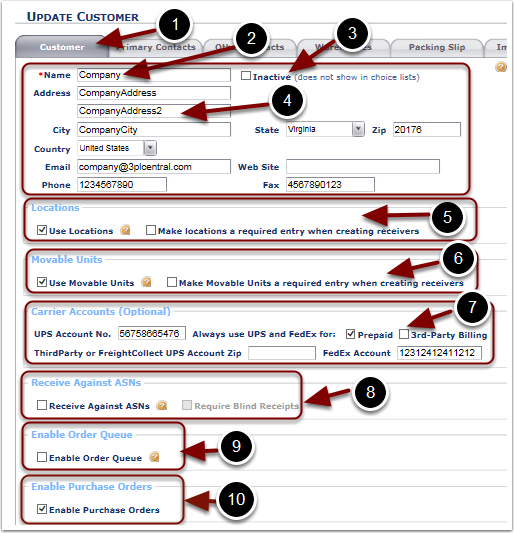
1.Select the Customer tab.
2.Provide the Customer Name in the Name field.
Note: Customer Name is the only field required for setting up a Customer. To maximize system functionality it is highly recommended that all relevant sections are completed.
3.Check the Inactive box to Inactivate the Customer. Inactivating will prevent transactions from being processed.
4.Enter data in the Address, Email, Web Site and Phone fields, as desired.
5.Check the Use Locations box for to enable the Customer to use warehouse locations to locate inventory. Check the Make locations a required entry when creating receivers box to force location put-away when receiving orders for the customer.
6.Check the Use Movable Units box to enable the Customer to use Movable Units, before their inventory can be received. Check the Make Movable Units a required entry when creating receivers to force the assignment of movable units when receiving orders for the customer.
7.In the Carrier Accounts section enter the customer’s UPS Account No. and/or FedEx Account number to quickly export shipping information from the system to the carrier’s entry interface. If UPS is being used, provide the Third Party or Freight Collect UPS Account Zip code. Check the boxes, as needed, next to Always use UPS and FedEx for Prepaid and/or 3rd-Party Billing.
8.Check the Receive Against ASN's box for to enable an ASN to be used as a guide during receipt. Check the Require Blind Receipts box for each customer who uses ASNs, but wishes to allow a blind receipt against the ASN.
9.Checking the Enable Order Queue box allows for orders to be imported, staged and assigned for shipping without allocating products against the order.
10.Checking the Enable Purchase Orders box allows for users to decide if the Purchase Order should be managed within 3PL Central Warehouse Manager or if the field should be populated with a PO value.
Continue on to the next page for details on the Settings section.
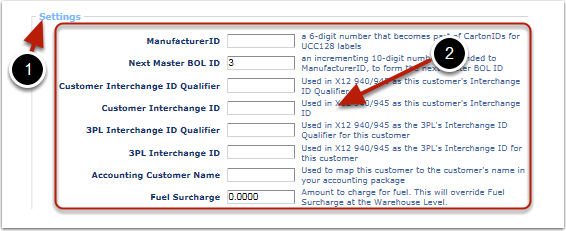
1.Settings section.
2.To enable smooth data transfer to other systems:
a.Enter a ManufacturerID - A 6-digit number that becomes part of CartonIDs for UCC128 labels.
b.Enter the Next Master BOL ID - An incrementing 10-digit number, appended to ManufacturerID, to form the next Master BOL ID.
c.Enter the Customer Interchange ID Qualifier - Used in X12 940/945 as this customer's Interchange ID Qualifier.
d.Enter the Customer Interchange ID - Used in X12 940/945 as this customer's Interchange ID.
e.Enter the 3PL Interchange ID Qualifier - Used in X12 940/945 as the 3PL's Interchange ID Qualifier for this customer.
f.Enter the 3PL Interchange ID - Used in X12 940/945 as the 3PL's Interchange ID for this customer.
g.Enter the Accounting Customer Name - Used to map this customer to the customer's name in your accounting package.
h.Enter the Fuel Surcharge - Amount to charge for fuel. This will override Fuel Surcharge at the Warehouse Level.
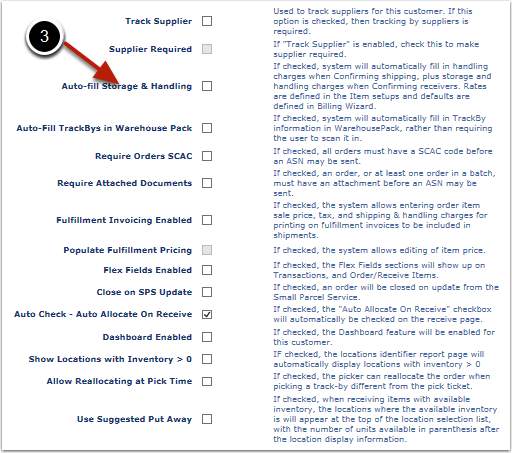
3.The options that display in this section may vary by Customer as they are enabled by 3PL Central Support team:
•Check the Track Supplier box to enable tracking Suppliers on Receipts.
•Check the Supplier Required box to make the Supplier required on Receipts.
•Check the Auto-fill Storage & Handling box to automatically populate charges when Confirming Orders and Receivers. Refer to the Billing Wizard guide to define the rates.
•Check the Auto-Fill Trackbys in Warehouse Pack box to automatically populate information such as Lot# or Expiration Date when scanning packages.
•Check the Require Order SCAC box to require the presence of a SCAC code on all orders before the ASN is transmitted.
•Check the Fulfillment Invoicing Enabled box to allow entry of Order item sales price, tax, and shipping & handling charges for printing on fulfillment invoices.
•Check the Populate Fulfillment Pricing box in order to allow editing of an item price.
•Check the Flex Fields Enabled box to allow the Flex Fields section to display on Orders and Receivers. Refer to the Flex Fields guide for more details.
•Check the Close on SPS Update box to close an Order upon update from the Small Parcel Service.
•Check the Auto Check-Auto Allocate on Receive box to have the Auto Allocate on Receipt indicator that displays when confirming a Receipt auto checked.
•Check the Dashboard Enabled box to enable the Dashboard feature. Refer to the Admin/Dashboard guide for more details.
•Check the Show Locations with Inventory > 0 in order to automatically set the Location Identifier Report to show these locations.
•Check the Allow Reallocating at Pick Time box in order to allow the picker to choose a trackby that is different from the Pick Ticket.
•Check the Use Suggested Putaway box in order to have locations display with available inventory, at the top of the list, when processing a receipt.
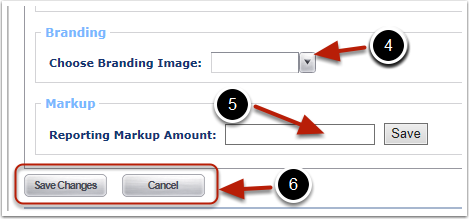
4.Use the drop down menu next to Choose Branding Image, to select a Customer logo. The file must be a .jpg or URL that was previously saved. The Branding Image will display in the Upper Left Hand corner of the 3PL Central Warehouse Manager user interface.
5.Enter an amount in the Markup field and click Save to apply to new invoices.
6.Click Save Changes button to Save the Customer now, or add information to the other Create Customer tabs then Saved. Select the Cancel button to return to the main page.