Manual Tab |
  
|
Manual Tab |
|
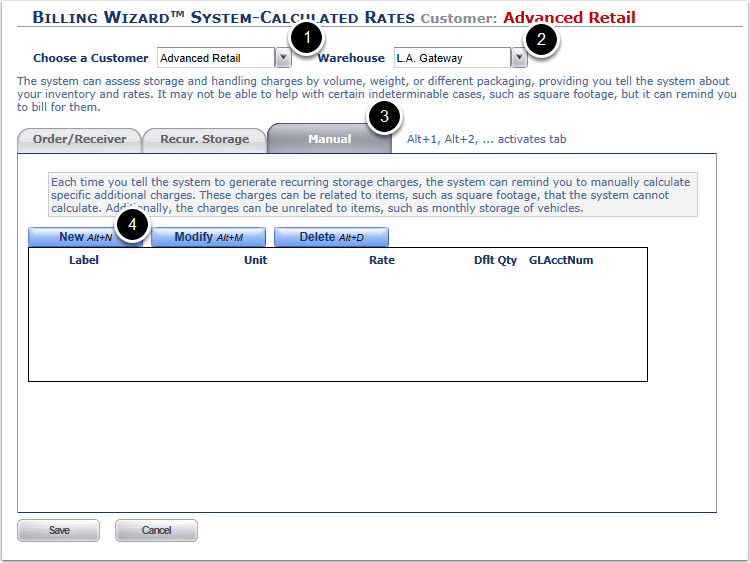
1.Select the Customer from the dropdown.
2.Select the Warehouse (Facility) from the dropdown.
3.Click the Manual Tab.
4.Click the New button to create a new recurring billing event.
The Non-Inventory Recurring Charges will be added to the storage charges at the end of each billing period.
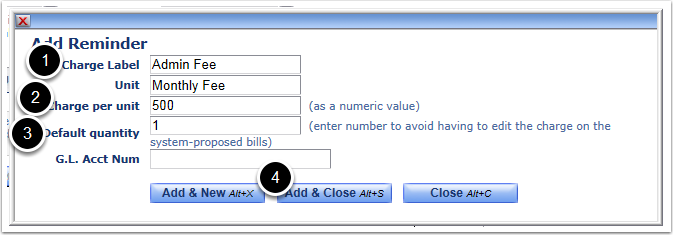
1.Create a name for the billing event and enter it in the Charge Label field and Enter the Unit Type of Unit of Measure for the charge.
2.Enter the Charge per unit.
3.Enter a Default Quantity to charge each billing period. To manually enter a quantity each billing period, leave the default value blank.
4.Save the billing event by clicking Add & Close.
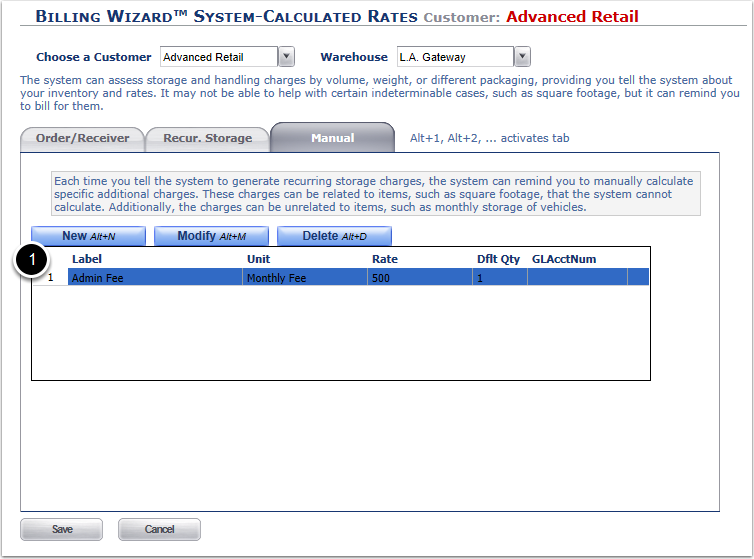
1. The Non Inventory storage charge will now display in the Manual Charge grid.
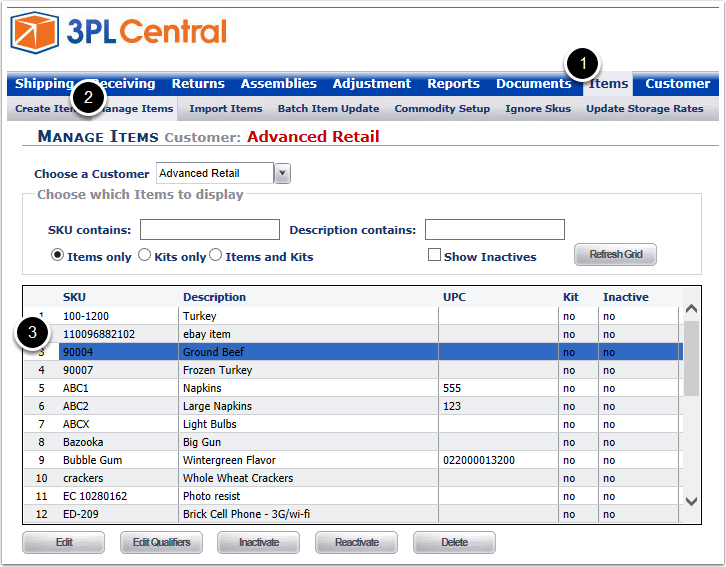
1.Navigate to Items.
2.Click Manage Items.
3.Select an Item and click Edit.
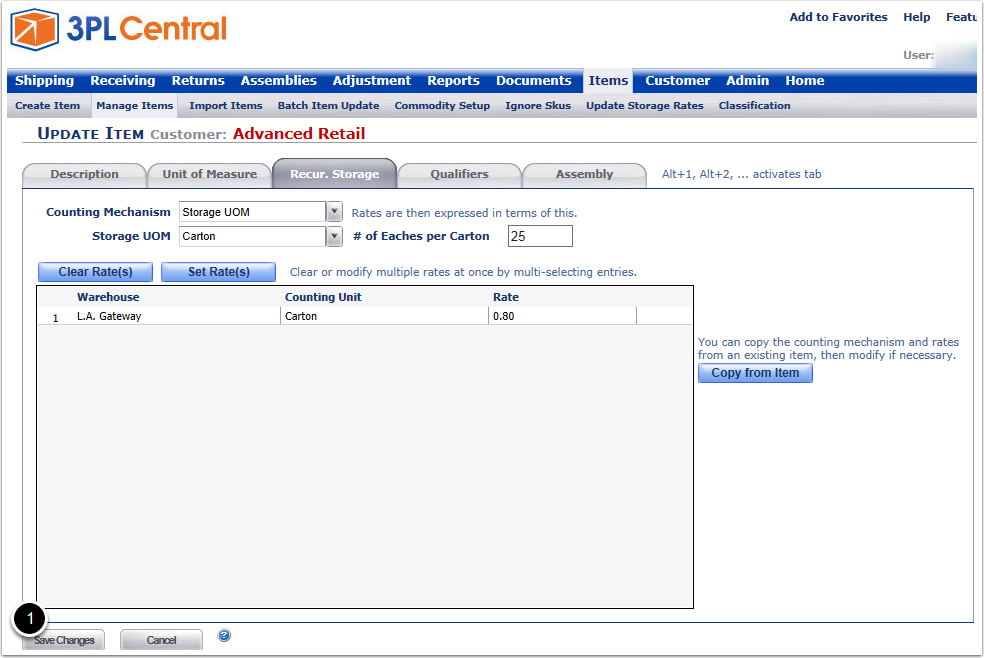
1.Navigate to the Recur. Storage tab of the Update Item screen.
2.Set the Recurring Storage Counting Mechanism from the drop down.
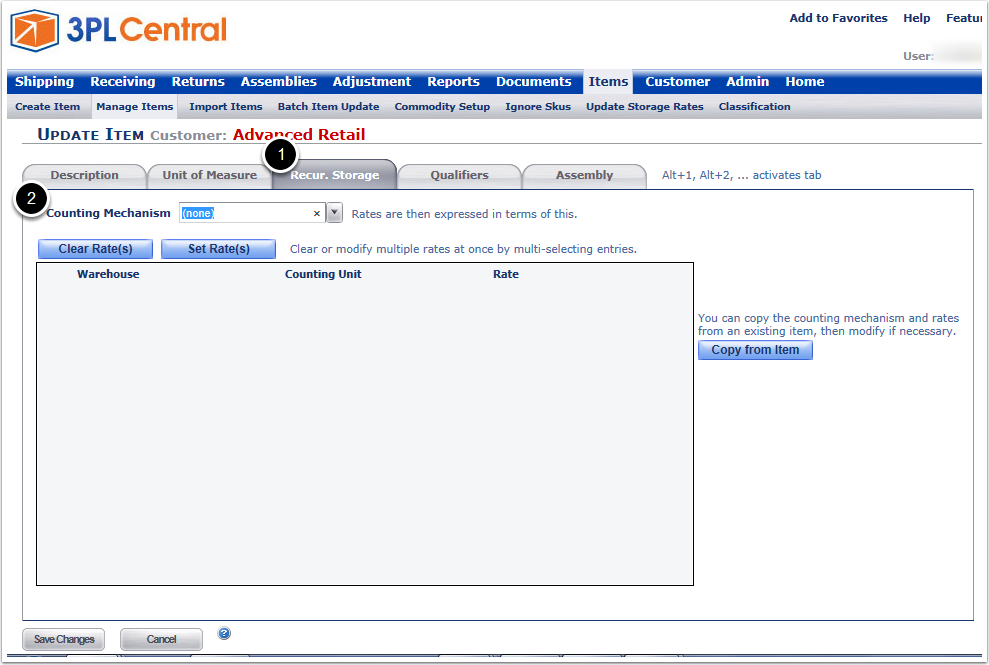
Select the Storage UOM Counting Mechanism to bill recurring storage by the each, carton, square foot or other value based on the primary unit of measure.
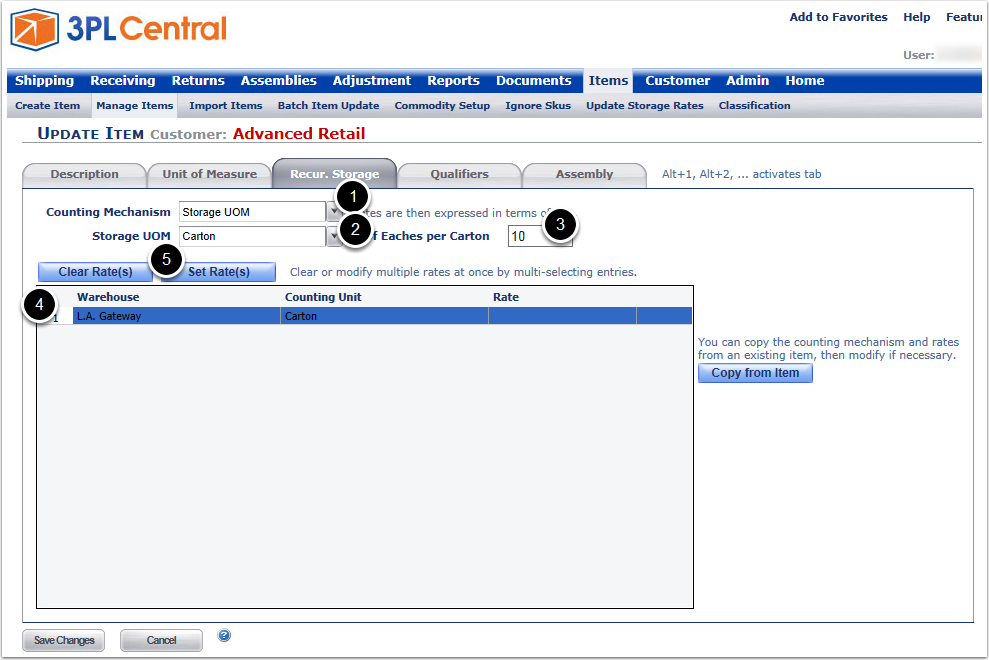
1.Choose Storage UOM from the drop-down.
2.Select the Unit of Measure used to calculate the storage charge for the item.
3.Enter the number of primary units of measure that are contained in the storage unit of measure.
4.Select the rate line item from the grid.
5.Click Set Rate(s).
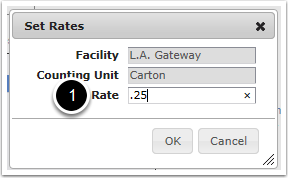
1. Enter the rate per storage unit of measure to charge each accrual period and click OK.
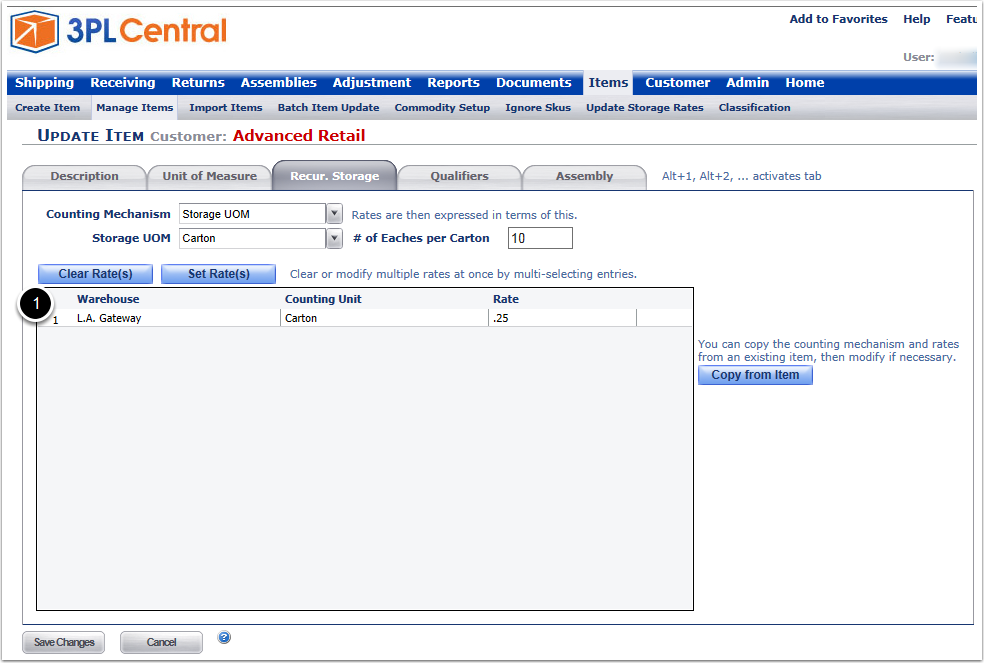
1. The Item's Unit of Measure and Rate per accrual period will be displayed in the grid.
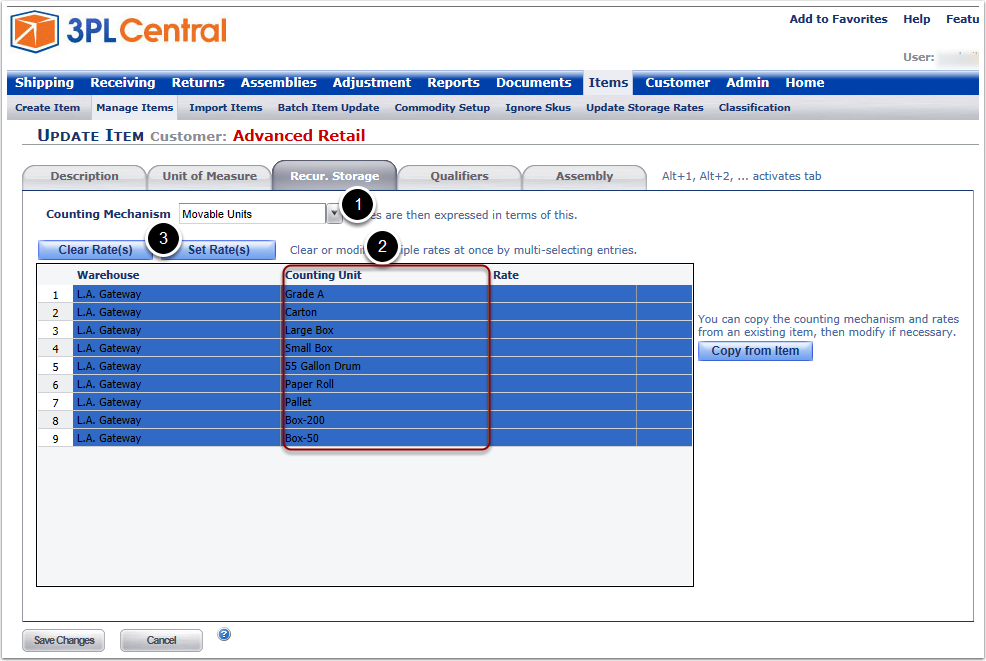
Set the Movable Unit Counting Mechanism when billing recurring storage based on physical movable units on hand such as pallets, gaylords or other containers. Note: Inventory must be placed on movable units to use the Movable Units counting mechanism.
1.Select Movable Units from the drop-down.
2.Select any or all Movable Unit Types as defined under Admin > Movable Units.
3.Click Set Rates.
Please note: Rates can be set by item by movable unit type for ultimate flexibility.
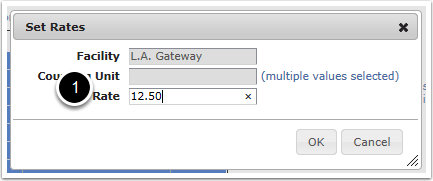
1. Enter the rate to charge per selected movable unit type per accrual period and click OK.
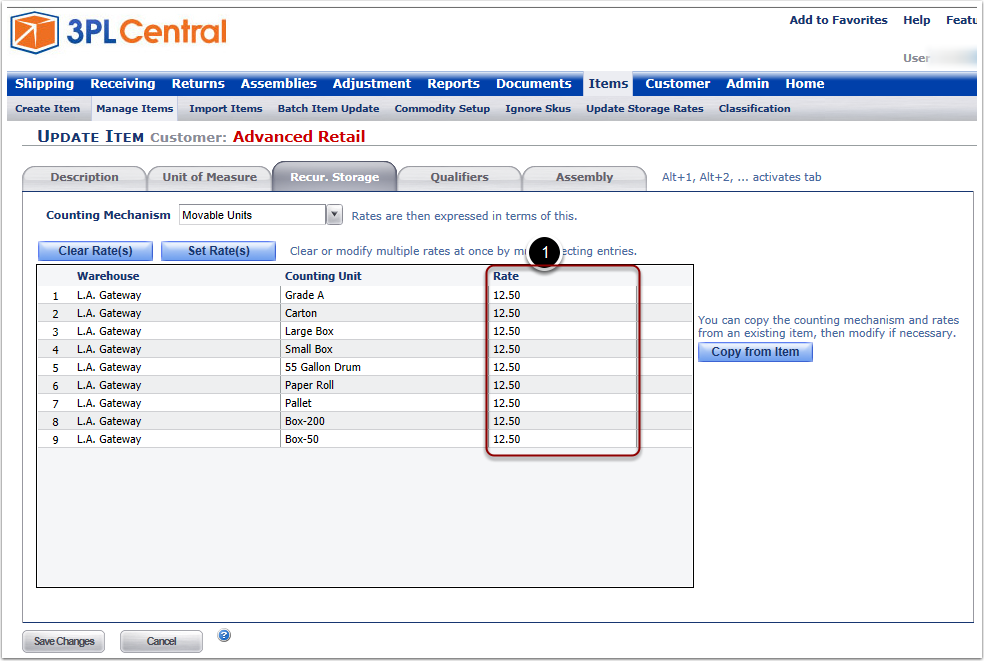
1. The Rate for all selected movable units will be set for this item.
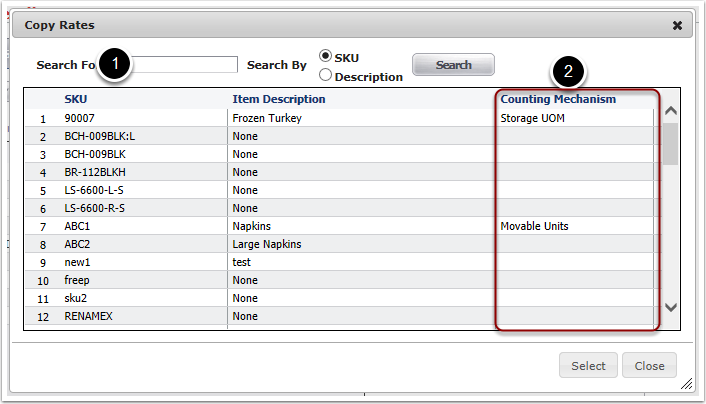
To copy a rate setup from one item to another:
1. Click the Copy From Item button.

1.Search for the item to copy the recurring storage rate setup from.
2.Confirm the counting mechanism setup of the items.
1.Click on an item line to copy the rates from.
2.Click Select.
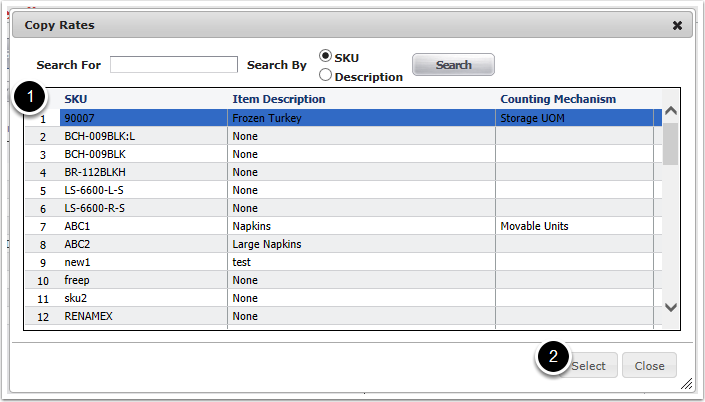
The selected item's recurring storage rates will override the previous item setup and both items will now have the same counting mechanism and rate.
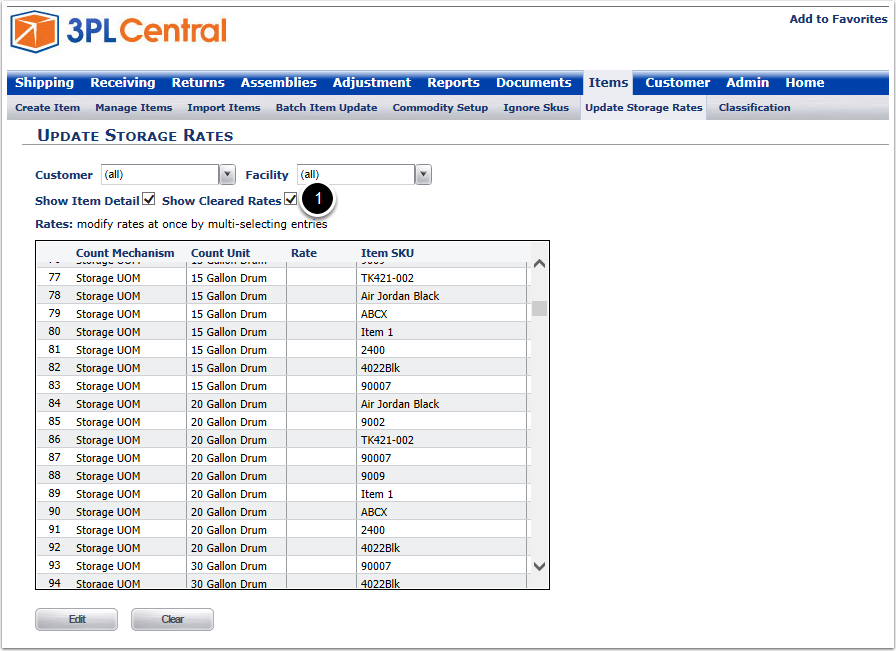
All Items can be edited at once using the Update Storage Rates Utility. This utility can also be used to set different storage rates for the same item across different facilities.
1.Click on Items.
2.Click Update Storage Rates.
3.By Default the grid will show all set rates and a count of the number of items set for the same billing mechanism. If all inventory is billed using the same rate and mechanism only one line item will be displayed with a total count of the number of items in the item master.
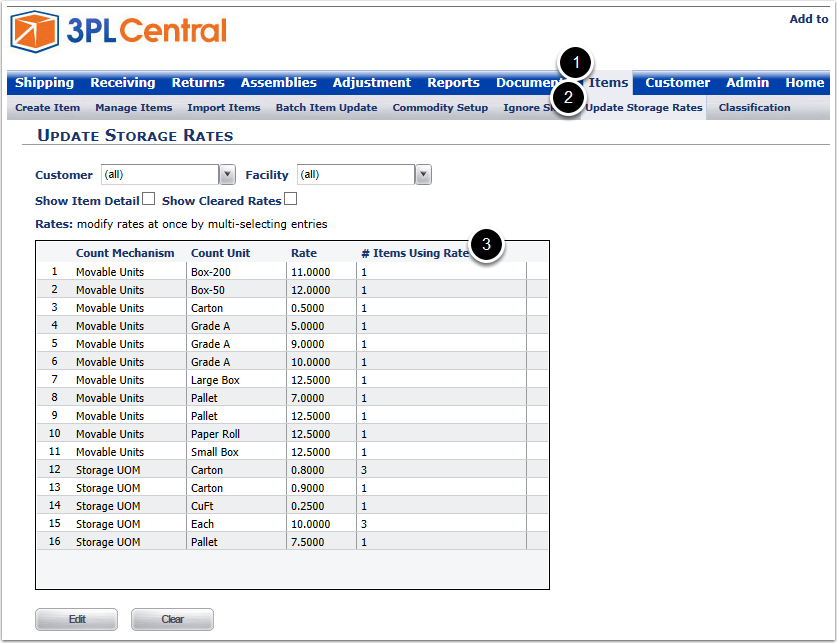
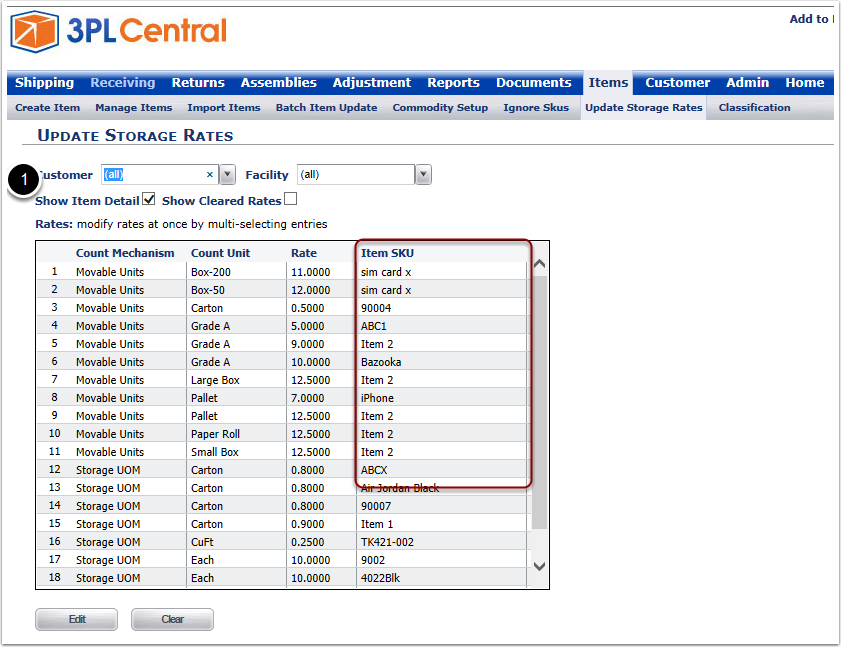
1. Click on the Show Item Detail box to expand the grid and list each SKU, counting mechanism, count unit and rate.
1. Click the Show Cleared Rates box to show all items that do not have recurring storage rates set.
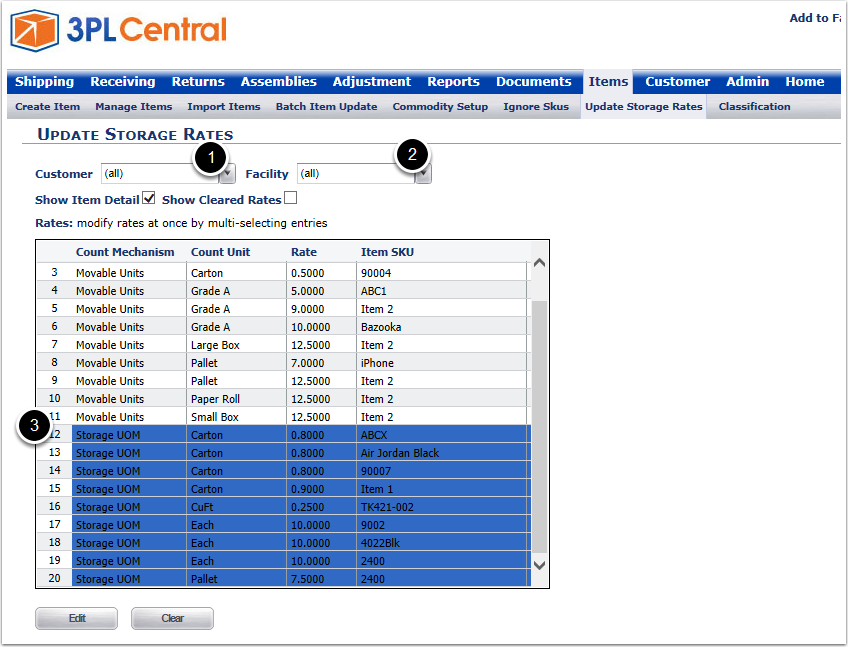
1.Select the Customer that owns the product.
2.Select the Facility for which to updates the rates of the items (Select "all" if the same rate will apply across all warehouses).
3.Select all Item rows to be updated.
Note: The Counting Mechanism cannot be changed from the Update Storage Rates Utility. Only Items with the same Counting Mechanism can be batch updated together.
1.Enter the new Recurring Storage Rate to apply to all selected items.
2.Review the list of items that will be updated by the change.
3.Click Save to complete the update.
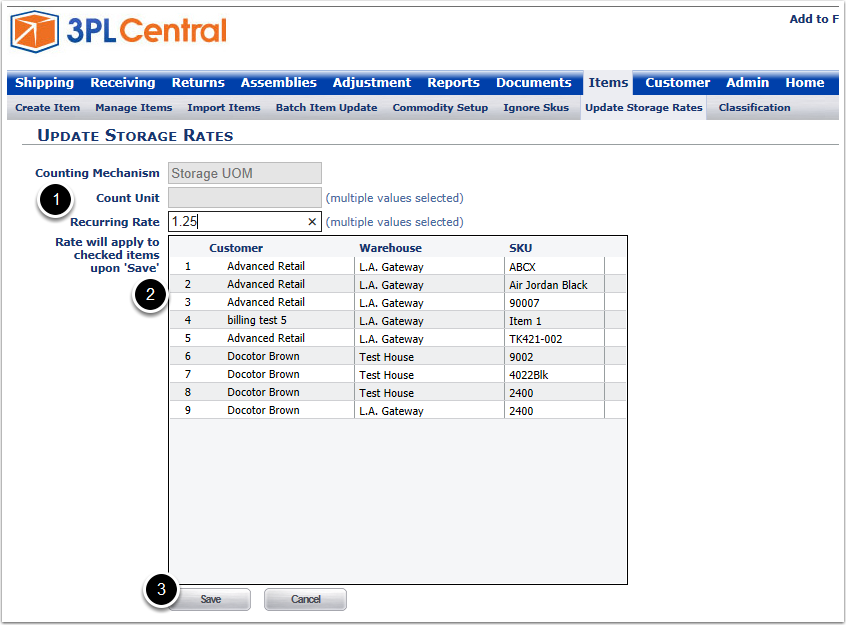
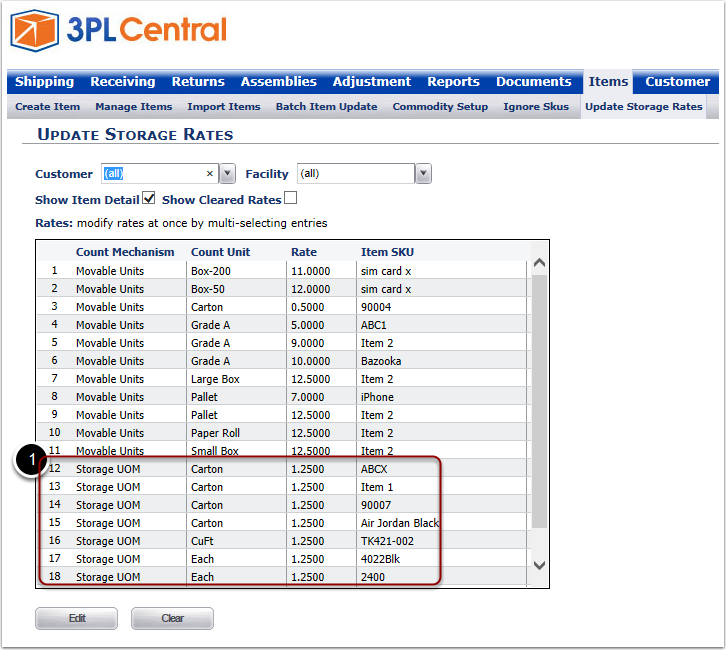
1. All selected items have been updated with the new rate.
At the end of each billing period, after the wait period specified on the Customer > Billing Wizard > Recurring Storage Setup the system will automatically calculate the billing charges and post the billing information to the Generate Recurring Storage Charges screen. From this screen the period billing can be reviewed, edited, regenerated and confirmed. Confirming a billing event will create a recurring storage transaction with the recurring billing.
1.Click on Admin.
2.Click Period Close.
3.Click Generate Recurring Storage Charges.
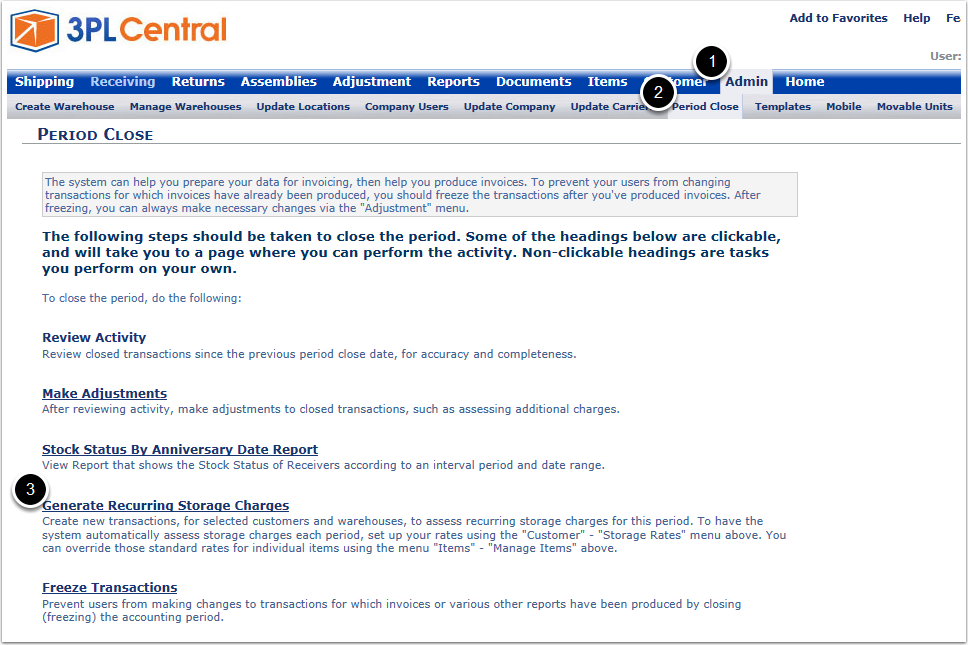
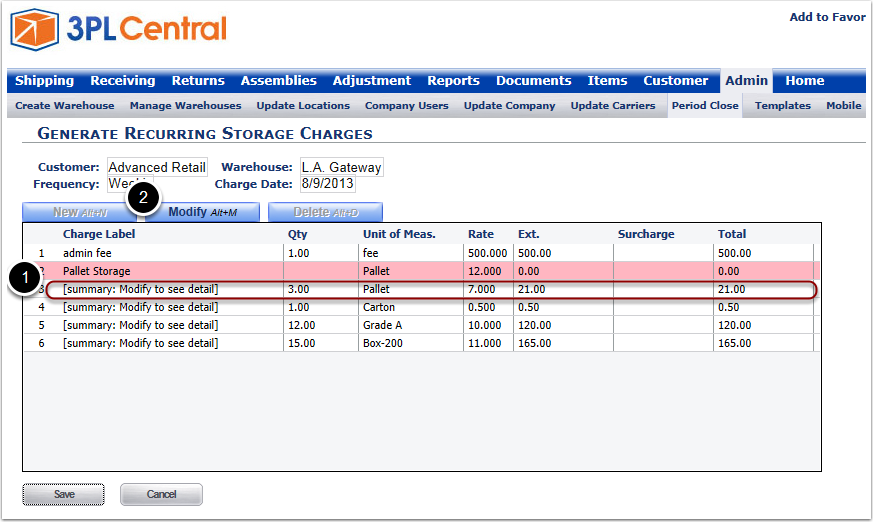
The Recurring Storage Charge Grid will display all automatically generated storage billings that have not been confirmed.
Line items listed in White have been fully auto generated based on the recurring storage setup parameters. Line items in Pink require additional information from the user. The additional information required is based on the Non-Inventory recurring billing rates set up on the Billing Wizard > Recurring Storage > Manual Tab.
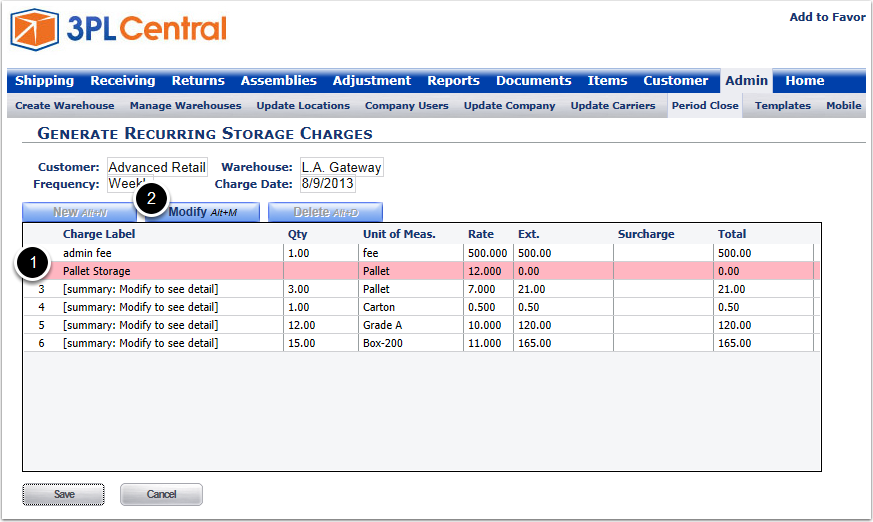
To Add the Manual recurring charges for a line item:
1.Click the Line Item.
2.Click Review/Edit.

The Review/Edit page will display a breakdown of the charges by unit of measure an/or movable unit. The lines that need manual intervention will be highlighted in Pink.
To add the manual billing quantities.
1.Click on one of the Pink highlighted lines.
2.Click the Modify button.
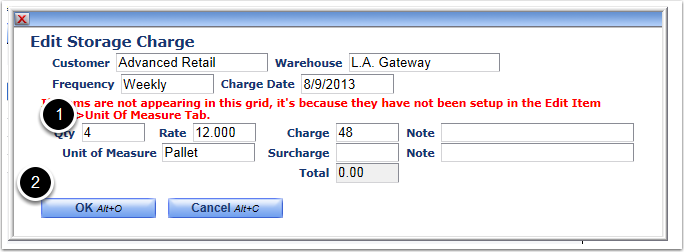
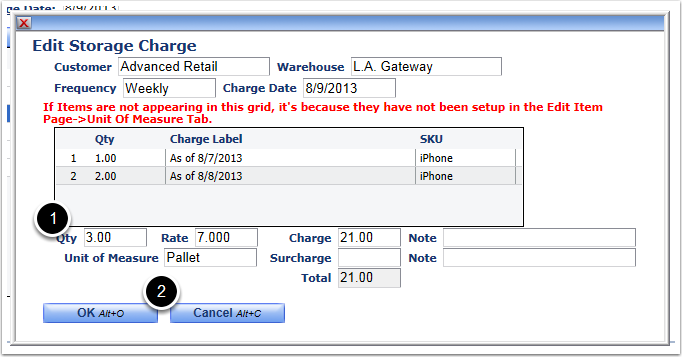
1.Enter the Quantity of the manual charge you wish to bill. Enter zero to waive the charges for the billing period.
2.Click OK.
1. The Line will highlight blue and turn white once the manual quantity is entered.
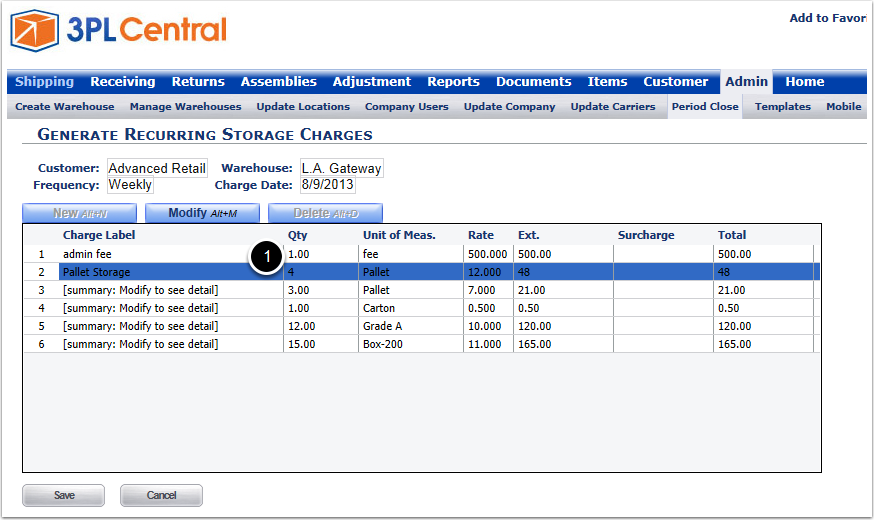
All auto calculated charges may also be reviewed or edited from the Review/Edit screen.
1.Click on one of the White, non-highlighted lines.
2.Click Modify.
The Detail window will display the quantity, charge label and SKU associated to each charge.
1.Edit the Quantity or Rate to make a change to the rate for this billing period.
2.Click OK to save any changes or Cancel to return to the previous screen.
In the event that the recurring storage billing was calculated prior to having all transactions completed for the period, the billing can be regenerated.
A user may make additions, changes or edits to transactions that should be included in the billing period. Once those adjustments have been made
1.Click the customer/period to regenerate billing for.
2.Click the Re-gen button.
Clicking the Re-gen button will remove the selected billing line from the grid and will trigger the period to recalculate. Recalculation may take between 10 and 15 minutes. Once the period has been recalculated a new line item with that period's billing will be displayed on the grid.
Note: Only the most currently ended period may be regenerated. For example, if the period ended on July 31st, you may regenerate those charges through August 31st. Once the next period ends on August 31st you may no longer regenerate the billing for the period ending on July 31st. You may make manual edits to older periods and confirm those periods at any time.
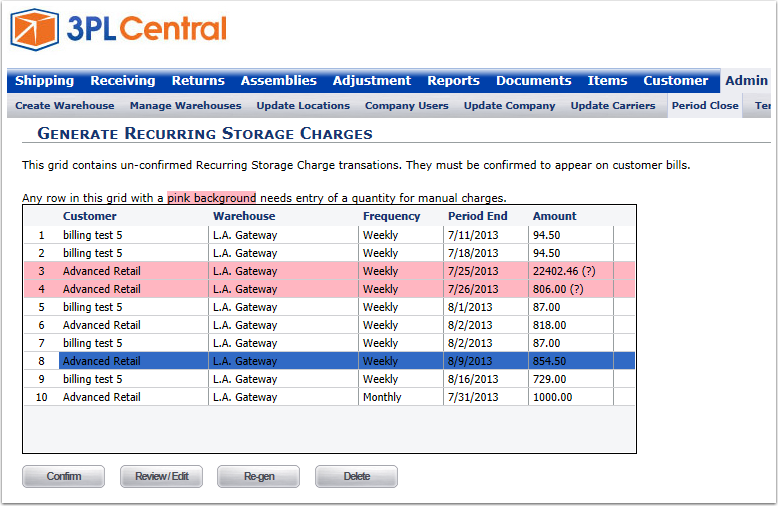
Once the period billing has been reviewed:
1.Select any or all billing lines from the grid.
2.Click Confirm.
Once the billing is confirmed a storage transaction will be created with the billing details and rates. This transaction will be available for viewing on the Print Invoices, Transaction Invoicing and Manage Invoices page and will be included for any accounting system invoice integrations.
Note: Once a billing period has been confirmed it cannot be re-opened. Any changes must be made through an additional adjustment.