Manage Open Receivings |
  
|
Manage Open Receivings |
|
Clicking a button on the Manage Open Receivings screen called Notify brings up a dialog box where you can define Notification information. This is something your customers can use, and you'll want to teach your customers what they need to include to make this function the way you want, and get you the information you want.
This view has a number of expanding sections that should each have their own help page, too.
On Line Items, Add - the Lot field can be used for anything. It's an internal number, if you want to use it.
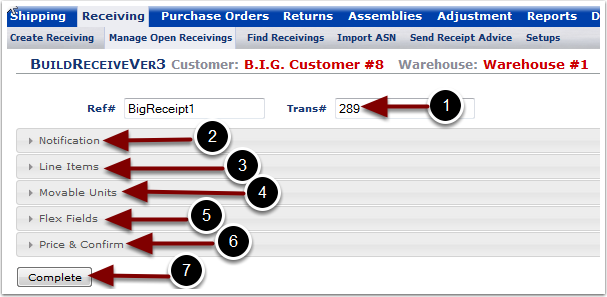
From the Manage Open Receivings submenu, the Notification Tab is always automatically opened. It can be closed to display the other sections of a Receiver, shown in the image below.
1.The Trans# is automatically assigned to the new Receiver by the system. This number is very beneficial in searching for transaction information in the system.
2.Notification is a default section and will always display on a receipt
3.Line Items is a default section and will always display on a receipt. It is required that a Receiver must contain at least 1 line item.
4.Movable Units is an optional section that is enabled at the Customer level (see the Manage Customer user guide)
5.Flex Fields is an optional section that is enabled at the Customer level (see the Manage Customer user guide)
6.Price & Confirm is a default section and will always display on a receipt. The Price information might be required depending on your Billing setup.
7.Important Note - After defining the Receiving and filling out all required and optional information, the Complete button must be selected to complete the Receiving